
UCSD CSE131/231 Syllabus and Logistics
- Joe Gibbs Politz (Instructor)
- Mark Barbone (tutor)
- Shubham Bhargava (tutor)
- Nico Lehmann (TA, 🦀)
- Rachel Lim (TA)
- Abhishek Sharma (TA)
- Ruochen Wang (TA)
Basics - Schedule - Staff & Resources - Grading - Policies
In this course, we'll explore the implementation of compilers: programs that transform source programs into other useful, executable forms. This will include understanding syntax and its structure, checking for and representing errors in programs, writing programs that generate code, and the interaction of generated code with a runtime system.
We will explore these topics interactively in lecure, you will implement an increasingly sophisticated series of compilers throughout the course to learn how different language features are compiled, and you will think through design challenges based on what you learn from implementation.
This web page serves as the main source of announcements and resources for the course, as well as the syllabus.
Basics
-
Lecture: Catalyst 0125, 12:00-12:50pm (noon) Mon/Wed/Fri
-
Discussion Section: SOLIS 107, 4:00-4:50pm Friday
-
Tests (in Friday Discussion Section): May 5 (Week 5), June 2 (Week 9)
-
Final Exam (used for making up test credit): Wed June 14, 11:30-2:30, Location TBD
-
Podcasts: podcast.ucsd.edu
-
Q&A Forum: EdStem
-
Gradescope: https://www.gradescope.com
-
Textbook/readings: There's no official textbook, but we will link to different online resources for you to read to supplement lecture. Versions of this course have been taught at several universities, so sometimes I'll link to those instructors' materials as well. Some useful resources are:
Schedule
The schedule below outlines topics, due dates, and links to assignments. The schedule of lecture topics might change slightly, but I post a general plan so you can know roughly where we are headed.
The typical due dates are that assignments are due on Tuesday evenings and quizzes are due Friday evenings.
Week 9:
Week 8:
- Handouts:
- Reading and Resources
Week 7:
- Handouts:
- Reading and Resources
Week 6
- Handouts:
- Reading and Resources
Week 5
- Handouts:
Week 4 - Functions and Calling Conventions
- Assignment (due Wednesday, May 3, 10pm)
- Handouts and recordings:
- Reading and Resources:
Week 3 - Tags, Conditionals, and Loops
- Assignment (due Tuesday, April 25)
- Handouts:
- Monday Handout: (pdf) (pptx) (code)
- Wednesday Handout (pdf)
- Friday Handout (pdf) (pptx) (code including print) (code including targets)
- Reading and Resources:
Week 2 - Binary Operators, Booleans, and Conditionals
- Assignment (due Tuesday, April 18, 10pm)
- Handouts:
- Reading and resources:
- Memory Representation of Values in Ocaml More discussion of a language with tagged value representations (and Ocaml is type-checked!).
- V8 Blog Post Including Number Representations This goes a little further than we are right now, but focus on the fact that V8, one of the widely deployed JS engines, uses tag bits for its numbers.
- Max New on Let and the Stack Max New and Ben Lerner have done a nice job writing up notes on some of my original scrawlings around this material. They don't use exactly the same style or make the same decisions I do in this class, but things are close enough to be useful.
Week 1 - Rust and Source to Assembly Conversion
- Assignment (due Tuesday, April 11, 10pm)
- Reading and resources:
- Friday Handout: (pdf) (pptx)
- Wednesday Handout: (pdf) (pptx) (code)
- Monday Handout
- Rust Book Chapters 1-6
- x86-64 quick reference (Stanford)
- x86-64 quick reference (Brown)
Staff & Resources
Office hours are concentrated on Friday, Monday, and Tuesday, since most assignments are due Tuesday evening. Please check the calendar before you come in case there have been any changes. When you come to the office hour, we may ask you to put your name in the queue using the whiteboard. Read the description about collaboration below for some context about office hours. The office hours schedule is below; each event has details about remote/in-person:
Course Components and Grading
Your grade will be calculated from engagement, assignments, and tests.
Assignments are given periodically, typically at one or two week intervals. On each you'll get a score from 0-3 (Incomplete/No Pass, Low Pass, Pass, High Pass).
There are two tests in the course, one in week 5 and one in week 9, given in the Friday discussion sections. Tests also get a score from 0-3. Finals week and the usual final exam block will give an opportunity to make up credit on these if you miss them or get low scores.
Engagement has two components – class participation and weekly (p)review quizzes. Most lectures will come with a 1-2 page handout, and you can submit the handout any time up until the start of the next lecture. Credit is given for reasonable effort in engaging with the notes from the day on the handout. Quizzes will release each week around Wednesday, and be due Sunday evening. These serve as a review of the past week and a preview of the coming week.
The standards for grade levels are:
-
A:
- Exam point total 5 or higher (High Pass on one exam and Pass or better on the other) (including final make-up)
- One of:
- High Pass on half the assignments, Pass on others, no missing assignments
- High Pass on 4 of 5 assignments from A4 (Caduceus) and later (planned 8 total assignments, actual total TBD), any grade on the other assignmentst. (If we end up with less than 8, I'll update this)
-
B:
- Exam point total 4 or higher (one High Pass and one Low Pass, or two Passes) (including final make-up)
- One of:
- Pass or above on all assignments, up to one missing assignment
- High pass on two assignments from A1-4, High pass on two assignments from A5-8, any grade on others
-
C
- Exam point total 3 or higher (including final make-up)
- Pass or above on half the assignments, any score on the others
You get credit for a quiz by getting most of the questions right. Engagement is used to add +/- modifiers at the end of the quarter, and won't make the difference between A/B/C etc.
Comprehensive Exam: For graduate students using this course for a comprehensive exam requirement, you must get "A" achievement on the exams. Note that you can use the final exam make-up time to do this!
Policies
Programming
In your professional programming life, some of your work will be highly collaborative with lots of expert advice available from senior developers and from sites like StackOverflow. This is a common case in many Web-focused companies, in academia, and on open-source projects. It’s a great way to get exposed to new techniques, share knowledge, and generally enjoy teamwork. In contrast, some of your work will involve figuring out programming problems on your own, where you are the first person to encounter an issue, or the first person to try using a new library in the context of your application. You should get experience in both types of situations; we might call the former kind of process open to collaboration and the latter closed to collaboration.
In terms of courses, this split also makes sense. Programming assignments serve (at least) two roles. First and foremost, they are a mechanism for you to learn! By directly applying the techniques and skills we discuss in class, you get practice and become a better programmer. Second, they are an assessment mechanism – as instructional staff we use them to evaluate your understanding of concepts as demonstrated by your programs. Open collaboration can reduce frustration while learning and give you chances to enjoy collaboration and lots of help, but may not let us accurately evaluate your understanding. Closed assignments are an opportunity for you to demonstrate what you know by way of programming (and some of the frustration of working through a problem on your own is healthy frustration).
There are two types of assignments in this course:
-
Open collaboration assignments, for which you can talk to anyone else in the course, post snippets of code online, get lots of help from TAs, and generally come up with solutions collaboratively. TAs will be happy to look at your code and suggest fixes, along with explaining them. There are a few restrictions:
- Any code that you didn't write must be cited in the README file that goes
along with your submission
- Example: On an open collaboration assignment, you and another student chat online about the solution, you figure out a particular helper method together. Your README should say “The FOO function was developed in collaboration with Firstname Lastname”
- Example: On an open collaboration assignment, a student posts the compilation strategy they used to handle a type of expression you were struggling with. Your README should say “I used the code from the forum post at [link]”
- Anyone you work with in-person must be noted in your README
- Example: You and another student sit next to each other in the lab, and point out mistakes and errors to one another as you work through the assignment. As a result, your solutions are substantially similar. Your README should say “I collaborated with Firstname Lastname to develop my solution.”
- You cannot share publicly your entire repository of code or paste an entire solution into a message board. Keep snippets to reasonable, descriptive chunks of code; think a dozen lines or so to get the point across.
- You still cannot use whole solutions that you find online (though copy-paste from Stack Overflow, tutorials etc, if you need help with Rust patterns, etc.) You shouldn't get assistance or code from students outside of this offering of the class. All the code that is handed in should be developed by you or someone in the class.
- If you can get ChatGPT, Copilot, or another LLM to generate code that works for the course, feel free, but you must put comments in your code describing the prompt you used to get it if you do. If you have Copilot on, put a comment if it generates an entire method or match case.
This doesn’t mean the staff will be handing out answers. We’ll mostly respond with leading questions and advice, and you shouldn’t expect a direct answer to questions like “am I done?” or “is my code right?”
There is no guarantee the assistance you get from your classmates is correct. It is your responsibility to use your judgment to avoid using an idea on the course message board that is wrong, or doesn’t work with your solution; we won’t necessarily tell you one way or another while the assignment is out.
If we see that you used code from other students and didn’t cite it in the README, the penalty will range from a point deduction to an academic integrity violation, depending on the severity. Always cite your work!
- Any code that you didn't write must be cited in the README file that goes
along with your submission
-
Closed collaboration assignments, where you cannot collaborate with others. You can ask clarification questions as private posts or of TAs. However, TAs will not look at your code or comment on it. Lab/office hours these weeks are for conceptual questions or for questions about past assignments only, no code assistance. On these assignments:
- You cannot look at or use anyone else's code for the assignment
- You cannot discuss the assignment with other students
- You cannot post publicly about the assignment on the course message board (or on social media or other forums). Of course, you can still post questions about material from lecture or past assignments!
- All of the examples in the open collaboration section above would be academic integrity violations on a closed collaboration assignment except for using tutorials/LLMs. If you use code from tutorials/Stack Overflow/LLMs, cite them as described above.
You can always use code from class or shared by the instructional team (properly attributed).
Programming assignments will explicitly list whether they are open or closed collaboration.
You should be familiar with the UCSD guidelines on academic integrity as well.
Late Work
Late work is generally not accepted, because often we'll release partial or full solutions immediately following the deadline for an assignment. Opportunities for making up missed credit are given in other ways, and will be described throughout the quarter.
Regrades
Mistakes occur in grading. Once grades are posted for an assignment, we will allow a short period for you to request a fix (announced along with grade release). If you don't make a request in the given period, the grade you were initially given is final.
Exams
There will be two tests during the quarter (held in discussion section) and a final exam. There are no make-up tests for the tests during the quarter. However, the final exam will have sections that correspond to each of the in-class tests, and if your score on that part of the final is higher than your score on that in-class test, the exam score replaces it. This includes the case where you miss an in-class test (scoring a 0), but can regain credit from that part of the final exam. This policy is designed to encourage you to treat the in-class tests as learning opportunities so that you can study any mistakes you make and re-apply that knowledge on the final.
In addition, if you score high enough on the tests during the quarter, you can skip the final exam with no penalty and just have the test grades applied as your exam score.
You are not allowed any study aids on exams, aside from those pertaining to university-approved accommodations. References will be provided along with exams to avoid unnecessary memorization.
You cannot discuss the content of exams with others in the course until grades have been released for that exam.
Some past exams are available at the link below for reference on format (content changes from offering to offering so this may not be representative):
https://drive.google.com/drive/folders/1yPxZ-nqRpC9Gz63JIavhQgfnyhA0uGIs?usp=sharing
Laptop/Device Policy in Lecture
There are lots of great reasons to have a laptop, tablet, or phone open during class. You might be taking notes, getting a photo of an important moment on the board, trying out a program that we're developing together, and so on. The main issue with screens and technology in the classroom isn't your own distraction (which is your responsibility to manage), it's the distraction of other students. Anyone sitting behind you cannot help but have your screen in their field of view. Having distracting content on your screen can really harm their learning experience.
With this in mind, the device policy for the course is that if you have a screen open, you either:
- Have only content onscreen that's directly related to the current lecture.
- Have unrelated content open and sit in one of the back two rows of the room to mitigate the effects on other students. I may remind you of this policy if I notice you not following it in class. Note that I really don't mind if you want to sit in the back and try to multi-task in various ways while participating in lecture (I may not recommend it, but it's your time!)
Diversity and Inclusion
We are committed to fostering a learning environment for this course that supports a diversity of thoughts, perspectives and experiences, and respects your identities (including race, ethnicity, heritage, gender, sex, class, sexuality, religion, ability, age, educational background, etc.). Our goal is to create a diverse and inclusive learning environment where all students feel comfortable and can thrive.
Our instructional staff will make a concerted effort to be welcoming and inclusive to the wide diversity of students in this course. If there is a way we can make you feel more included please let one of the course staff know, either in person, via email/discussion board, or even in a note under the door. Our learning about diverse perspectives and identities is an ongoing process, and we welcome your perspectives and input.
We also expect that you, as a student in this course, will honor and respect your classmates, abiding by the UCSD Principles of Community (https://ucsd.edu/about/principles.html). Please understand that others’ backgrounds, perspectives and experiences may be different than your own, and help us to build an environment where everyone is respected and feels comfortable.
If you experience any sort of harassment or discrimination, please contact the instructor as soon as possible. If you prefer to speak with someone outside of the course, please contact the Office of Prevention of Harassment and Discrimination: https://ophd.ucsd.edu/.

Adder
In this assignment you'll implement a compiler for a small language called
Adder, that supports 32-bit integers and three operations – add1, sub1,
and negate. There is no starter code for this assignment; you'll do it from
scratch based on the instructions here.
Setup
The necessary tools are installed on ieng6.ucsd.edu, and you should have a
course-specific account set up that you can access via
ETS. You can use standard remote access
tools like ssh or Visual Studio Code plugins like
sshfs
to match your preferred working style.
You may also want to work on your own computer. You will need to install rust
and cargo:
https://www.rust-lang.org/tools/install
You may also (depending on your system) need to install
nasm. On OSX I used brew install nasm; on other
systems your package manager of choice likely has a version. On Windows you
should use Windows Subsystem for Linux (WSL)
The assignments assume that your computer can build and run x86-64-bit
binaries. This is true of most (but not all) mass-market Windows and Linux
laptops. Newer Macs use a different ARM architecture, but can also run legacy
x86-64-bit binaries, so those are fine as well. You should ensure that
whatever you do to build your compiler also runs on ieng6, which is our
standard environment for testing these.
The first few sections of the Rust Book walk you through installing Rust, as well. We'll assume you've gone through the “Programming a Guessing Game” chapter of that book before you go on, so writing and running a Rust program isn't too weird to you.
The Adder Language
In each of the next several assignments, we'll introduce a language that we'll implement. We'll start small, and build up features incrementally. We're starting with Adder, which has just a few features –numbers and three operations.
There are a few pieces that go into defining a language for us to compile:
- A description of the concrete syntax – the text the programmer writes.
- A description of the abstract syntax – how to express what the programmer wrote in a data structure our compiler uses.
- A description of the behavior of the abstract syntax, so our compiler knows what the code it generates should do.
Concrete Syntax
The concrete syntax of Adder is:
<expr> :=
  | <number>
  | (add1 <expr>)
  | (sub1 <expr>)
  | (negate <expr>)
Abstract Syntax
The abstract syntax of Adder is a Rust datatype, and corresponds nearly
one-to-one with the concrete syntax. We'll show just the parts for add1 and
sub1 in this tutorial, and leave it up to you to include negate to get
practice.
enum Expr {
    Num(i32),
    Add1(Box<Expr>),
    Sub1(Box<Expr>)
}
The Box type is necessary in Rust to create recursive types like these (see
Enabling Recursive Types with
Boxes).
If you're familiar with C, it serves roughly the same role as introducing a
pointer type in a struct field to allow recursive fields in structs.
The reason this is necessary is that the Rust compiler calculates a size and
tracks the contents of each field in each variant of the enum. Since an
Expr could be an Add1 that contains another Add1 that contains another
Add1... and so on, there's no way to calculate the size of an enum variant like
Add1(Expr)
(What error do you get if you try?)
Values of the Box type always have the size of a single reference (probably
represented as a 64-bit address on the systems we're using). The address will
refer to an Expr that has already been allocated somewhere. Box is one of
several smart pointer types whose memory are carefully, and automatically,
memory-managed by Rust.
Semantics
A ``semantics'' describes the languages' behavior without giving all of the assembly code for each instruction.
An Adder program always evaluates to a single i32.
- Numbers evaluate to
themselves (so a program just consisting of
Num(5)should evaluate to the integer5). add1andsub1expressions perform addition or subtraction by one on their argument.negateproduces the result of the argument multiplied by-1
There are several examples further down to make this concrete.
Here are some examples of Adder programs:
Example 1
Concrete Syntax
(add1 (sub1 5))
Abstract Syntax
Add1(Sub1(Number(5)))
Result
5
Example 2
Concrete Syntax
4
Abstract Syntax
Number(4)
Result
4
Example 3
Concrete Syntax
(negate (add1 3))
Abstract Syntax
Negate(Add1(Number(3)))
Result
-4
Implementing a Compiler for Adder
We're going to start by just compiling numbers, so we can see how all the infrastructure works. We won't give starter code for this so that you see how to build this up from scratch.
By just compiling numbers, we mean that we'll write a compiler for a language where the “program” file just contains a single number, rather than full-fledged programs with function definitions, loops, and so on. (We'll get there!)
Creating a Project
First, make a new project with
$ cargo new adder
This creates a new directory, called adder, set up to be a Rust project.
The main entry point is in src/main.rs, which is where we'll develop the
compiler. There's also a file called Cargo.toml that we'll use in a little
bit, and a few other directories related to building that we won't be too
concerned with in this assignment.
The Runner
We'll start by just focusing on numbers.
It's useful to set up the goal of our compiler, which we'll come back to repeatedly in this course:
“Compiling” an expression means generating assembly instructions that evaluate it and leave the answer in the
raxregister.
Given this, before writing the compiler, it's useful to spend some time thinking about how we'll run these assembly programs we're going to generate. That is, what commands do we run at the command line in order to get from our soon-to-be-generated assembly to a running program?
We're going to use a little Rust program to kick things off. It will look like
this; you can put this into a file called runtime/start.rs:
#[link(name = "our_code")]
extern "C" {
    // The \x01 here is an undocumented feature of LLVM (which Rust uses) that ensures
    // it does not add an underscore in front of the name, which happens on OSX
    // Courtesy of Max New
    // (https://maxsnew.com/teaching/eecs-483-fa22/hw_adder_assignment.html)
    #[link_name = "\x01our_code_starts_here"]
    fn our_code_starts_here() -> i64;
}

fn main() {
  let i : i64 = unsafe {
    our_code_starts_here()
  };
  println!("{i}");
}
This file says:
- We're expecting there to be a precompiled file called
libour_codethat we can load and link against (we'll make it in a few steps) - That file should define a global function called
our_code_starts_here. It takes no arguments and returns a 64-bit integer. - For the
mainof this Rust program, we will call theour_code_starts_herefunction in anunsafeblock. It has to be in anunsafeblock because Rust doesn't and cannot check thatour_code_starts_hereactually takes no arguments and returns an integer; it's trusting us, the programmer, to ensure that, which isunsafefrom its point of view. Theunsafeblock lets us do some kinds of operations that would otherwise by compile errors in Rust. - Then, print the result.
Let's next see how to build a libour_code file out of some x86-64 assembly
that will work with this file. Here's a simple assembly program that has a
global label for our_code_starts_here that has a “function body” that
returns the value 31:
section .text
global our_code_starts_here
our_code_starts_here:
  mov rax, 31
  ret
Put this into a file called test/31.s if you like, to test things out (you
should now have a runtime/ and a test/ directory that you created).
We can create a standalone binary program that combines these with these
commands (substitute macho64 for elf64 on OSX):
$ nasm -f elf64 test/31.s -o runtime/our_code.o
$ ar rcs runtime/libour_code.a runtime/our_code.o
$ ls runtime
libour_code.a          our_code.o             start.rs
$ rustc -L runtime/ runtime/start.rs -o test/31.run
$ ./test/31.run
31
The first command assembles the assembly code to an object file. The basic
work there is generating the machine instructions for each assembly
instruction, and enough information about labels like our_code_starts_here to
do later linking. The ar command takes this object file and puts it in a
standard format for library linking used by #[link in Rust. Then
rustc combines that .a file and start.rs into a single executable binary
that we named 31.run.
We haven't written a compiler yet, but we do know how to go from files
containing assembly code to runnable binaries with the help of nasm and
rustc. Our next task is going to be writing a program that generates assembly
files like these.
Generating Assembly
Let's revisit our definition of compiling:
“Compiling” an expression means generating assembly instructions that evaluate it and leave the answer in the
raxregister.
Since, for now, our programs are going to be single expressions (in fact just
single numbers), this means that for a program like “5”, we want to generate
assembly instructions that put the constant 5 into rax.
Let's write a Rust function that does that, with a simple main function that
shows it working on a single hardcoded input; this goes in src/main.rs and is
the start of our compiler:
/// Compile a source program into a string of x86-64 assembly
fn compile(program: String) -> String {
    let num = program.trim().parse::<i32>().unwrap();
    return format!("mov rax, {}", num);
}

fn main() {
    let program = "37";
    let compiled = compile(String::from(program));
    println!("{}", compiled);
}
You can compile and run this with cargo run:
$ cargo run
   Compiling adder v0.1.0 (/Users/joe/src/adder)
mov rax, 37
Really all I did here was look up the documentation in Rust about converting a
string to an integer and template the number into a mov command. The input
37 is hardcoded, and to use the output like we did above, we'd need to
copy-paste the mov command into a larger assembly file with
our_code_starts_here, and so on.
Here's a more sophisticated main that takes two command-line arguments: a
source file to read and a target file to write the resulting assembly to. It
also puts the generated command into the template we designed for our generated
assembly:
use std::env;
use std::fs::File;
use std::io::prelude::*;

fn main() -> std::io::Result<()> {
    let args: Vec<String> = env::args().collect();

    let in_name = &args[1];
    let out_name = &args[2];

    let mut in_file = File::open(in_name)?;
    let mut in_contents = String::new();
    in_file.read_to_string(&mut in_contents)?;

    let result = compile(in_contents);

    let asm_program = format!("
section .text
global our_code_starts_here
our_code_starts_here:
  {}
  ret
", result);

    let mut out_file = File::create(out_name)?;
    out_file.write_all(asm_program.as_bytes())?;

    Ok(())
}
Since this now expects files rather than hardcoded input, let's make a test
file in test/37.snek that just contains 37 as contents. Then we'll read the
“program” (still just a number) from 37.snek and store the resulting
assembly in 37.s. (snek is a meme-y spelling of snake, which is a theme of
the languages in this course.)
Then we can run our compiler with these command line arguments:
$ cat test/37.snek
37
$ cargo run -- test/37.snek test/37.s
$ cat test/37.s

section .text
global our_code_starts_here
our_code_starts_here:
  mov rax, 37
  ret
Then we can use the same sequence of commands from before to run the program:
$ nasm -f elf64 test/37.s -o runtime/our_code.o
$ ar rcs runtime/libour_code.a runtime/our_code.o
$ rustc -L runtime/ runtime/start.rs -o test/37.run
$ ./test/37.run
37
We're close to saying we've credibly built a “compiler”, in that we've taken some source program and gone all the way to a generated binary.
The next steps will be to clean up the clumsiness of running 3 post-processing
commands (nasm, ar, and rustc), and then adding some nontrivial
functionality.
Cleaning up with a Makefile
There are a lot of thing we could do to try and assemble and run the program,
and we'll discuss some later in the course. For now, we'll simply tidy up our
workflow by creating a Makefile that runs through the compile-assemble-link
steps for us. Put these rules into a file called Makefile in the root of the
repository (use elf64 on Linux):
test/%.s: test/%.snek src/main.rs
	cargo run -- $< test/$*.s

test/%.run: test/%.s runtime/start.rs
	nasm -f macho64 test/$*.s -o runtime/our_code.o
	ar rcs runtime/libour_code.a runtime/our_code.o
	rustc -L runtime/ runtime/start.rs -o test/$*.run
(Note that make requires tabs not spaces, but we can only use spaces on the
website, so please replace the four spaces indentation with tab characters when
you copy it -- or copy it from Github.)
And then you can run just make test/<file>.run to do the build steps:
$ make test/37.run
cargo run -- test/37.snek test/37.s
    Finished dev [unoptimized + debuginfo] target(s) in 0.07s
     Running `target/x86_64-apple-darwin/debug/adder test/37.snek test/37.s`
nasm -f macho64 test/37.s -o runtime/our_code.o
ar rcs runtime/libour_code.a runtime/our_code.o
rustc -L runtime/ runtime/start.rs -o test/37.run
The cargo run command will re-run if the .snek file or the compiler
(src/main.rs) change, and the assemble-and-link commands will re-run if the
assembly (.s file) or the runtime (runtime/start.rs) change.
Adding Nontrivial Language Features
The overall syntax for the Adder language admits many more features than just
numbers. With the definition of Adder above, we can have programs like (add1 (sub1 6)), for example. There can be any numbers of layers of nesting of the
parentheses, which means we need to think about parsing a little bit more.
We're going to design our syntax carefully to avoid thinking too much about parsing, though. The parenthesized style of Adder is a subset of what's called s-expressions. The Scheme and Lisp family of languages are some of the more famous examples of languages built in s-expressions, but recent ones like WebAssembly also use this syntax, and it's a common choice for language development to simplify decision around syntax, which can become quite tricky and won't be our focus in this course.
A grammar for s-expressions looks something like:
s-exp := number
       | symbol
       | string
       | ( <s-exp>* )
That is, an s-expression is either a number, symbol (think of symbol like an identifier name), string, or a parenthesized sequence of s-expressions. Here are some s-expressions:
(1 2 3)
(a (b c d) e "f" "g")

(hash-table ("a" 100) ("b" 1000) ("c" 37"))

(define (factorial n)
  (if (== n 1)
      1
      (factorial (* n (- n 1)))))

(class Point
  (int x)
  (int y))

(add1 (sub1 37))
One attractive feature of s-expressions is that most programming languages have
libraries for parsing them. There are several crates available for parsing
s-expressions in Rust. You're free to pick another one if you like it, but I'm
going to use sexp because its type definitions
work pretty well with pattern-matching and I find that helpful.
(lexpr also looks interesting, but the
Value type is really clumsy with pattern matching so it's not great for this
tutorial.)
We can add ths package to our project by adding it to Cargo.toml, which was
created when you used cargo new. Make it so your Cargo.toml looks like this:
[package]
name = "adder"
version = "0.1.0"
edition = "2021"

[dependencies]
sexp = "1.1.4"
Then you can run cargo build and you should see stuff related to the sexp
crate be downloaded.
We can then use it in our program like this:
use sexp::*;
use sexp::Atom::*;
Then, a function call like this can turn a string into a Sexp:
let sexp = parse("(add1 (sub1 (add1 73)))").unwrap()
(As a reminder, the .unwrap() is our way of telling Rust that we are trusting
this parsing to succeed, and we'll panic! and stop the program if the parse
doesn't succeed. We will talk about giving better error messages in these cases
later.)
Our goal, though, is to use a datatype that we design for our expressions, which we introduced as:
enum Expr {
    Num(i32),
    Add1(Box<Expr>),
    Sub1(Box<Expr>),
}
So we should next write a function that takes Sexps and turns them into
Exprs (or gives an error if we give an s-expression that doesn't match the
grammar of Adder). Here's a function that will do the trick:
fn parse_expr(s: &Sexp) -> Expr {
    match s {
        Sexp::Atom(I(n)) => Expr::Num(i32::try_from(*n).unwrap()),
        Sexp::List(vec) => {
            match &vec[..] {
                [Sexp::Atom(S(op)), e] if op == "add1" => Expr::Add1(Box::new(parse_expr(e))),
                [Sexp::Atom(S(op)), e] if op == "sub1" => Expr::Sub1(Box::new(parse_expr(e))),
                _ => panic!("parse error"),
            }
        },
        _ => panic!("parse error"),
    }
}
(A Rust note – the parse_expr function takes a reference to Sexp (the type
&Sexp) which means parse_expr will have read-only, borrowed access to some
Sexp that was allocated and stored somewhere else.)
This uses Rust pattern matching to match the specific cases we care about
for Adder – plain numbers and lists of s-expressions. In the case of lists, we
match on two the two specific cases that look like add1 or sub1 followed by
some other s-expression. In those cases, we recursively parse, and use
Box::new to match the signature we set up in enum Expr.
So we've got a way to go from more structure text—s-expressions—stored in
files and produce our Expr structure. Now we just need to go from the Expr
ASTs to generated assembly. Here's one way to do that:
fn compile_expr(e: &Expr) -> String {
    match e {
        Expr::Num(n) => format!("mov rax, {}", *n),
        Expr::Add1(subexpr) => compile_expr(subexpr) + "\nadd rax, 1",
        Expr::Sub1(subexpr) => compile_expr(subexpr) + "\nsub rax, 1",
    }
}
And putting it all together in main:
fn main() -> std::io::Result<()> {
    let args: Vec<String> = env::args().collect();

    let in_name = &args[1];
    let out_name = &args[2];

    let mut in_file = File::open(in_name)?;
    let mut in_contents = String::new();
    in_file.read_to_string(&mut in_contents)?;

    let expr = parse_expr(&parse(&in_contents).unwrap());
    let result = compile_expr(&expr);
    let asm_program = format!("
section .text
global our_code_starts_here
our_code_starts_here:
  {}
  ret
", result);

    let mut out_file = File::create(out_name)?;
    out_file.write_all(asm_program.as_bytes())?;

    Ok(())
}
Then we can write tests like this add.snek:
$ cat test/add.snek
(sub1 (sub1 (add1 73)))
And run our whole compiler end-to-end:
$ make test/add.run
cargo run -- test/add.snek test/add.s
    Finished dev [unoptimized + debuginfo] target(s) in 0.02s
     Running `target/x86_64-apple-darwin/debug/adder test/add.snek test/add.s`
nasm -f macho64 test/add.s -o runtime/our_code.o
ar rcs runtime/libour_code.a runtime/our_code.o
rustc -L runtime/ runtime/start.rs -o test/add.run
$ cat test/add.s

section .text
global our_code_starts_here
our_code_starts_here:
  mov rax, 73
add rax, 1
sub rax, 1
sub rax, 1
  ret
$ ./test/add.run
72
This is, of course, a very simple language. This tutorial serves mainly to make us use all the pieces of infrastructure that we'll build on throughout the quarter:
- An assembler (
nasm) and a Rust main program (runtime/start.rs) to build binaries - A definition of abstract syntax (
enum Expr) - A parser for text (
parsefrom thesexpcrate) and a parser for our abstract syntax (parse_expr) - A code generator (
compile_expr) that generates assembly fromExprs
Most of our future assignments will be built from just these pieces, plus extra infrastructure added as we need it.
Your TODOs
- Do the whole tutorial above, creating the project repository as you go. Write several tests to convince yourself that things are working as expected.
- Then, add support for
negateas described in the beginning, and write several tests fornegateas well. - In your terminal, demonstrate your compiler working on at least 5 different
examples by using
caton a sourcesnekfile, then showingmakerunning, usingcaton the resulting.sfile, and then running the resulting binary. Copy this interactino into a file calledtranscript.txt
Hand in your entire repository to the assignment-1-tutorial assignment on
Gradescope. There is no automated grading for this assignment; we want you to
practice gaining your own confidence that your solution works (and
demonstrating that to us).

Week 2: Boa, Due Tuesday, April 18 (Open Collaboration)
In this assignment you'll implement a compiler for a small language called Boa, that has let bindings and binary operators. The key difference between this language and what we implemented in class is that there can be multiple variables defined within a single let. There are a number of other details where we fill in exact behavior.
Setup
Get the assignment at https://classroom.github.com/a/1bvTt9dk. This will make a private-to-you copy of the repository hosted within the course's organization. You can also access the public starter code directly from this public URL if you don't have or prefer not to use a Github account.
The Boa Language
In each of the next several assignments, we'll introduce a language that we'll implement. We'll start small, and build up features incrementally. We're starting with Boa, which has just a few features – defining variables, and primitive operations on numbers.
There are a few pieces that go into defining a language for us to compile:
- A description of the concrete syntax – the text the programmer writes.
- A description of the abstract syntax – how to express what the programmer wrote in a data structure our compiler uses.
- A description of the behavior of the abstract syntax, so our compiler knows what the code it generates should do.
Concrete Syntax
The concrete syntax of Boa is:
<expr> :=
  | <number>
  | <identifier>
  | (let (<binding> +) <expr>)
  | (add1 <expr>)
  | (sub1 <expr>)
  | (+ <expr> <expr>)
  | (- <expr> <expr>)
  | (* <expr> <expr>)

<binding> := (<identifier> <expr>)
Here, a let expression can have one or more bindings (that's what the
<binding> + notation means). <number>s are in base 10 and must be
representable as an i32. <identifier>s are names and should be limited to
alphanumeric characters, hyphens, and underscores, and should start with a
letter. (The sexp library handles more than this, but this keeps things
nicely readable.)
Abstract Syntax
The abstract syntax of Boa is a Rust enum. Note that this
representation is different from what we used in
Adder.
enum Op1 {
    Add1,
    Sub1
}

enum Op2 {
    Plus,
    Minus,
    Times
}

enum Expr {
    Number(i32),
    Id(String),
    Let(Vec<(String, Expr)>, Box<Expr>),
    UnOp(Op1, Box<Expr>),
    BinOp(Op2, Box<Expr>, Box<Expr>)
}
Semantics
A "semantics" describes the languages' behavior without giving all of the assembly code for each instruction.
A Boa program always evaluates to a single integer.
- Numbers evaluate to
themselves (so a program just consisting of
Number(5)should evaluate to the integer5). - Unary operator expressions perform addition or subtraction by one on
their argument. If the result wouldn't fit in an
i32, the program can have any behavior (e.g. overflow withadd1or underflow withsub1). - Binary operator expressions evaluate their arguments and combine them
based on the operator. If the result wouldn't fit in an
i32, the program can have any behavior (e.g. overflow or underflow with+/-/*). - Let bindings should use lexical scoping: evaluate all the binding expressions to values one by one, and after each, store a mapping from the given name to the corresponding value in both (a) the rest of the bindings, and (b) the body of the let expression. Identifiers evaluate to whatever their current stored value is.
There are several examples further down to make this concrete.
The compiler should stop and report an error if:
- There is a binding list containing two or more bindings with the same name. The error should contain the string
"Duplicate binding" - An identifier is unbound (there is no surrounding let binding for it) The error should contain the string
"Unbound variable identifier {identifier}"(where the actual name of the variable is substituted for{identifier})
If there are multiple errors, the compiler can report any non-empty subset of them.
Here are some examples of Boa programs. In the "Abstract Syntax" parts, we
assume that the program has appropriate use statements to avoid the Expr::
and other prefixes in order to write the examples compactly.
Example 1
Concrete Syntax
5
Abstract Syntax
Number(5)
Result
5
Example 2
Concrete Syntax
(sub1 (add1 (sub1 5)))
Abstract Syntax
UnOp(Sub1, Box::new(UnOp(Add1, Box::new(UnOp(Sub1, Box::new(Number(5)))))))
Result
4
Example 3
Concrete Syntax
(let ((x 5)) (add1 x))
Abstract Syntax
Let(vec![("x".to_string(), Number(5))],
  Box::new(UnOp(Add1, Box::new(Id("x".to_string())))))
Result
6
More examples
(sub1 5)
# as an expr
UnOp(Sub1, Box::new(Number(5)))
# evaluates to
4
(let ((x 10) (y 7)) (* (- x y) 2))
# as an expr
Let(vec![("x".to_string(), Number(10)), ("y".to_string(), Number(7))],
    Box::new(BinOp(Times, Box::new(BinOp(Minus, Box::new(Id("x".to_string())),
                          Box::new(Id("y".to_string())))), Box::new(Number(2)))));
# evaluates to
6
Implementing a Compiler for Boa
You've been given a starter codebase that has several pieces of infrastructure:
- A main program (
main.rs) that uses the parser and compiler to produce assembly code from an input Boa text file. You don't need to edit this much except to change howresultis filled in. - A
Makefileand a runner (runtime/start.rs) that are basically the same as the ones from Week 1 - Extra infrastructure for running unit tests in
tests/infra(you don't need to edittests/infra, but you may enjoy reading it). - A test file,
tests/all_tests.rs, which describes the expected output and expected errors for.snekfiles in thetests/directory. You will add your own tests by filling in new entries insuccess_tests!andfailure_tests!; we've provided a few examples. Each entry corresponds to a single.snekfile. You will add a lot more – focus on making these interesting and thorough!
Writing the Parser
The parser will be given a S-expression representing the whole program, and
must build a AST of the Expr data type from this S-expression.
An S-expression in Rust is of the following type:
pub enum Sexp {
    Atom(Atom),
    List(Vec<Sexp>),
}
pub enum Atom {
    S(String),
    I(i64),
    F(f64),
}
Thus, an example S-expression that could be parsed into a program would be as follows
List(vec![Atom("let"), List(vec![List(vec![Atom("x"), Atom("5")])]), Atom("x")])
which corresponds to
(let ((x 5)) x)
in Boa or
{
    let x = 5;
    x
}
in Rust.
This should then parse to the AST
Let(vec![("x".to_string(), Number(5))], Id("x".to_string()))
which can then be compiled.
Since most S-expressions are lists, you will need to check the first element of
the list to see if the operation to perform is a let, add1, *, and so on.
If an S-expression is of an invalid form, (i.e. a let with no body, a +
with three arguments, etc.) panic with a message containing the string
"Invalid".
You can assume that an id is a valid string of form [a-zA-z][a-zA-Z0-9]*.
You will, however, have to check that the string does not match any of
the language's reserved words, such as let, add1, and sub1.
The parsing should be implemented in
fn parse_expr(s: &Sexp) -> Expr {
    todo!("parse_expr");
}
You can also implement a helper function parse_bind
fn parse_bind(s: &Sexp) -> (String, Expr) {
    todo!("parse_bind");
}
which may be helpful for handling let expressions.
Writing the Compiler
The primary task of writing the Boa compiler is simple to state: take an
instance of the Expr type and turn it into a list of assembly
instructions. Start by defining a function that compiles an expression into a
list of instructions:
fn compile_to_instrs(e: &Expr) -> Vec<Instr> {
    todo!("compile_to_instrs");
}
which takes an Expr value (abstract syntax) and turns it into a list of
assembly instructions, represented by the Instr type. Use only the
provided instruction types for this assignment; we will be gradually expanding
this as the quarter progresses.
Note: For variable bindings, we used im::HashMap<String, i32> from the
im crate.
We use the immutable HashMap here to make nested scopes easier because we
found it annoying to remember to pop variables when you leave a scope.
You're welcome to use any reasonable strategy here.
The other functions you need to implement are:
fn instr_to_str(i: &Instr) -> String {
    todo!("instr_to_str");
}

fn val_to_str(v: &Val) -> String {
    todo!("val_to_str");
}
They render individual instances of the Instr type and Val type into a string
representation of the instruction. This second step is straightforward, but
forces you to understand the syntax of the assembly code you are generating.
Most of the compiler concepts happen in the first step, that of generating
assembly instructions from abstract syntax. Feel free to ask or refer to
on-line resources if you want more information about a particular assembly
instruction!
After that, put everything together with a compile function that compiles an
expression into assembly represented by a string.
fn compile(e: &Expr) -> String {
    todo!("compile");
}
Assembly instructions
The Instr type is defined in the starter code. The assembly instructions that
you will have to become familiar with for this assignment are:
-
IMov(Val, Val)— Copies the right operand (source) into the left operand (destination). The source can be an immediate argument, a register or a memory location, whereas the destination can be a register or a memory location.Examples:
mov rax, rbx mov [rax], 4 -
IAdd(Val, Val)— Add the two operands, storing the result in its first operand.Example:
add rax, 10 -
ISub(Val, Val)— Store in the value of its first operand the result of subtracting the value of its second operand from the value of its first operand.Example:
sub rax, 216 -
IMul(Val, Val)— Multiply the left argument by the right argument, and store in the left argument (typically the left argument israxfor us)Example:
imul rax, 4
Running
Put your test .snek files in the test/ directory. Run make test/<file>.s
to compile your snek file into assembly.
$ make test/add1.s
cargo run -- test/add1.snek test/add1.s
$ cat test/add1.s

section .text
global our_code_starts_here
our_code_starts_here:
  mov rax, 131
  ret
To actually evaluate your assembly code, we need to link it with runtime.rs to
create an executable. This is covered in the Makefile.
$ make test/add1.run
nasm -f elf64 test/add1.s -o runtime/our_code.o
ar rcs runtime/libour_code.a runtime/our_code.o
rustc -L runtime/ runtime/start.rs -o test/add1.run
Finally you can run the file by executing to see the evaluated output:
$ ./test/add1.run
131
Ignoring or Changing the Starter Code
You can change a lot of what we describe above; it's a (relatively strong) suggestion, not a requirement. You might have different ideas for how to organize your code or represent things. That's a good thing! What we've shown in class and this writeup is far from the only way to implement a compiler.
To ease the burden of grading, we ask that you keep the following in mind: we
will grade your submission (in part) by copying our own tests/ directory in
place of the one you submit and running cargo test -- --test-threads 1. This relies on the
interface provided by the Makefile of producing .s files and .run files.
It doesn't rely on any of the data definitions or function signatures in
src/main.rs. So with that constraint in mind, feel free to make new
architectural decisions yourself.
Strategies, and FAQ
Working Incrementally
If you are struggling to get started, here are a few ideas:
- Try to tackle features one at a time. For example, you might completely ignore let expressions at first, and just work on addition and numbers to start. Then you can work into subtraction, multiplication, and so on.
- Some features can be broken down further. For example, the let expressions in this assignment differ from the ones in class by having multiple variables allowed per let expression. However, you can first implement let for just a single variable (which will look quite a bit like what we did in class!) and then extend it for multiple bindings.
- Use git! Whenver you're in a working state with some working tests, make a commit and leave a message for yourself. That way you can get back to a good working state later if you end up stuck.
FAQ
What should (let ((x 5) (z x)) z) produce?
From the PA writeup: “Let bindings should evaluate all the binding expressions to values one by one, and after each, store a mapping from the given name to the corresponding value in both (a) the rest of the bindings, and (b) the body of the let expression. Identifiers evaluate to whatever their current stored value is.”
Do Boa programs always have the extra parentheses around the bindings?
In Boa, there's always the extra set of parens around the list.
Can we write additional helper functions?
Yes.
Do we care about the text return from panic?
Absolutely. Any time you write software you should strive to write thoughtful error messages. They will help you while debugging, you when you make a mistake coming back to your code later, and anyone else who uses your code.
As for the autograder, we expect you to catch parsing and compilation errors. For parsing errors you should panic! an error message containing the word Invalid. For compilation errors, you should catch duplicate binding and unbound variable identifier errors and panic! Duplicate binding and Unbound variable identifier {identifier} respectively. We've also added these instructions to the PA writeup.
How should we check that identifiers are valid according to the description in the writeup?
From the PA writeup: “You can assume that an id is a valid string of form [a-zA-z][a-zA-Z0-9]*. You will, however, ...”
Assume means that we're not expecting you to check this for the purposes of the assignment (though you're welcome to if you like).
What should the program () compile to?
Is () a Boa program (does it match the grammar)? What should the compiler do with a program that doesn't match the grammar?
What's the best way to test? What is test case
A few suggestions:
- First, make sure to test all the different expressions as a baseline
- Then, look at the grammar. There are lots of places where
<expr>appears. In each of those positions, any other expression could appear. Soletcan appear inside+and vice versa, and in the binding position of let, and so on. Make sure you've tested enough nested expressions to be confident that each expression works no matter the context - Names of variables are interesting – the names can appear in different places and have different meanings depending on the structure of let. Make sure that you've tried different combinations of
letnaming and uses of variables.
My tests non-deterministically fail sometimes
You are probably running cargo test instead of cargo test -- --test-threads 1. The testing infrastructure interacts with the file system in a way that can cause data races when
tests run in parallel. Limiting the number of threads to 1 will probably fix the issue.
Grading
A lot of the credit you get will be based on us running autograded tests on your submission. You'll be able to see the result of some of these on while the assignment is out, but we may have more that we don't show results for until after assignments are all submitted.
We'll combine that with some amount of manual grading involving looking at your
testing and implementation strategy. You should have your own thorough test
suite (it's not unreasonable to write many dozens of tests; you probably don't
need hundreds), and you need to have recognizably implemented a compiler. For
example, you could try to calculate the answer for these programs and
generate a single mov instruction: don't do that, it doesn't demonstrate the
learning outcomes we care about.
Any credit you lose will come with instructions for fixing similar mistakes on future assignments.
Extension: Assembling Directly from Rust
Boa is set up as a traditional ahead-of-time compiler that generates an assembly file and (with some help from system linkers) eventually a binary.
Many language systems work this way (it's what rustc, gcc, and clang do,
for instance), but many modern systems also generate machine code directly from
the process that runs the compiler, and the compiler's execution can be
interleaved with users' program execution. This isn't a new
idea,
Smalltalk and LISP are early examples of languages built atop runtime code
generation. JavaScript engines in web browsers are likely the most ubiquitous
use case.
Rust, with detailed control over memory and a broad package system, provides a pretty good environment for doing this kind of runtime code generation. In these assignment extensions, we'll explore how to build on our compiler to create a system in this style, and showcase some unique features it enables.
These extensions are not required, nor are they graded. However, we'd be delighted to hear about what you're trying for them in office hours, see what you've done, and give feedback on them. Joe and the staff have done a little bit of work to proof-of-concept some of this, but you'll be largely on your own and things aren't guaranteed to be obviously possible.
The primary tool we think is particularly useful here is
dynasm.
(You might also find assembler useful,
but it hasn't been updated in a while and dynasm was what Joe found easiest
to use). The basic idea is that dynasm provides Rust macros that build up a
vector of bytes representing machine instructions. References to these vectors
can be cast using
mem::transmute Rust functions,
which can be called from our code.
As a first step towards building a dynamic system, you should try building a
REPL, or read-eval-print loop, re-using as much as possible from the Boa
compiler. That is, you should be able to support interactions like the below,
where one new syntactic form, define, has been added.
$ cargo run -- -i # rather than input/output files, specify -i for interactive
> (let ((x 5)) (+ x 10))
15
> (define x 47)
> x
47
> (+ x 4)
51
A sample of how to get started with this is at adder-dyn. We won't give any hints or support beyond this except:
- The REPL is probably best implemented as a
whileloop inmain - You'll need to figure out how to store the
defined variables on the heap somewhere and refer to them from the generated code
Happy hacking!

Week 3: Cobra, Due Tuesday, April 25 (Open Collaboration)
(Yes, that's 3 open collaboration assignments in a row 🙂)
In this assignment you'll implement a compiler for a small language called Cobra, which extends Boa with booleans, conditionals, variable assignment, and loops.
Setup
Get the assignment at https://classroom.github.com/a/mHUq5XJd This will make a private-to-you copy of the repository hosted within the course's organization. You can also access the public starter code https://github.com/ucsd-compilers-s23/cobra-starter if you don't have or prefer not to use a Github account.
The Cobra Language
Concrete Syntax
The concrete syntax of Cobra is:
<expr> :=
  | <number>
  | true
  | false
  | input
  | <identifier>
  | (let (<binding>+) <expr>)
  | (<op1> <expr>)
  | (<op2> <expr> <expr>)
  | (set! <name> <expr>)
  | (if <expr> <expr> <expr>)
  | (block <expr>+)
  | (loop <expr>)
  | (break <expr>)

<op1> := add1 | sub1 | isnum | isbool
<op2> := + | - | * | < | > | >= | <= | =

<binding> := (<identifier> <expr>)
true and false are literals. Names used in let cannot have the name of
other keywords or operators (like true or false or let or block).
Numbers should be representable as a signed 63-bit number (e.g. from
-4611686018427387904 to 4611686018427387903).
Abstract Syntax
You can choose the abstract syntax you use for Cobra. We recommend something like this:
enum Op1 { Add1, Sub1, IsNum, IsBool, }

enum Op2 { Plus, Minus, Times, Equal, Greater, GreaterEqual, Less, LessEqual, }

enum Expr {
    Number(i32),
    Boolean(bool),
    Id(String),
    Let(Vec<(String, Expr)>, Box<Expr>),
    UnOp(Op1, Box<Expr>),
    BinOp(Op2, Box<Expr>, Box<Expr>),
    If(Box<Expr>, Box<Expr>, Box<Expr>),
    Loop(Box<Expr>),
    Break(Box<Expr>),
    Set(String, Box<Expr>),
    Block(Vec<Expr>),
}
Semantics
A "semantics" describes the languages' behavior without giving all of the assembly code for each instruction.
A Cobra program always evaluates to a single integer, a single boolean, or ends
with an error. When ending with an error, it should print a message to
standard error (eprintln! in Rust works well for this) and a non-zero exit
code (std::process::exit(N) for nonzero N in Rust works well for this).
inputexpressions evaluate to the first command-line argument given to the program. The command-line argument can be any Cobra value: a valid number ortrueorfalse. If no command-line argument is provided, the value ofinputisfalse. When running the program the argument should be provided astrue,false, or a base-10 number value.- All Boa programs evaluate in the same way as before, with one
exception: if numeric operations would overflow a 63-bit integer, the program
should end in error, reporting
"overflow"as a part of the error. - If the operators other than
=are used on booleans, an error should be raised from the running program, and the error should contain "invalid argument". Note that this is not a compilation error, nor can it be in all cases due toinput's type being unknown until the program starts. - The relative comparison operators like
<and>evaluate their arguments and then evaluate totrueorfalsebased on the comparison result. - The equality operator
=evaluates its arguments and compares them for equality. It should raise an error if they are not both numbers or not both booleans, and the error should contain "invalid argument" if the types differ. - Boolean expressions (
trueandfalse) evaluate to themselves ifexpressions evaluate their first expression (the condition) first. If it'sfalse, they evaluate to the third expression (the “else” block), and to the second expression if any other value (including numbers).blockexpressions evaluate the subexpressions in order, and evaluate to the result of the last expression. Blocks are mainly useful for writing sequences that includeset!, especially in the body of a loop.set!expressions evaluate the expression to a value, and change the value stored in the given variable to that value (e.g. variable assignment). Theset!expression itself evaluates to the new value. If there is no surrounding let binding for the variable the identifier is considered unbound and an error should be reported.loopandbreakexpressions work together. Loops evaluate their subexpression in an infinite loop untilbreakis used. Break expressions evaluate their subexpression and the resulting value becomes the result of the entire loop. Typically the body of a loop is written withblockto get a sequence of expressions in the loop body.
There are several examples further down to make this concrete.
The compiler should stop and report an error if:
- There is a binding list containing two or more bindings with the same name.
The error should contain the string
"Duplicate binding" - An identifier is unbound (there is no surrounding let binding for it) The
error should contain the string
"Unbound variable identifier {identifier}"(where the actual name of the variable is substituted for{identifier}) - A
breakappears outside of any surroundingloop. The error should contain "break" - An invalid identifier is used (it matches one of the keywords). The error should contain "keyword"
If there are multiple errors, the compiler can report any non-empty subset of them.
Here are some examples of Cobra programs.
Example 1
Concrete Syntax
(let ((x 5))
     (block (set! x (+ x 1))))
Abstract Syntax Based on Our Design
Let(vec![("x".to_string(), Number(5))],
    Box::new(Block(
      vec![Set("x".to_string(),
               Box::new(BinOp(Plus, Id("x".to_string()),
                                    Number(1)))])))
Result
6
Example 2
(let ((a 2) (b 3) (c 0) (i 0) (j 0))
  (loop
    (if (< i a)
      (block
        (set! j 0)
        (loop
          (if (< j b)
            (block (set! c (sub1 c)) (set! j (add1 j)))
            (break c)
          )
        )
        (set! i (add1 i))
      )
      (break c)
    )
  )
)
Result
-6
Example 3
This program calculates the factorial of the input.
(let
  ((i 1) (acc 1))
  (loop
    (if (> i input)
      (break acc)
      (block
        (set! acc (* acc i))
        (set! i (+ i 1))
      )
    )
  )
)
Implementing a Compiler for Cobra
The starter code makes a few infrastructural suggestions. You can change these as you feel is appropriate in order to meet the specification.
Reporting Dynamic Errors
We've provided some infrastructure for reporting errors via the
snek_error
function in start.rs. This is a function that can be called from the
generated program to report an error. for now we have it take an error code as
an argument; you might find the error code useful for deciding which error
message to print. This is also listed as an extern in the generated
assembly startup
code.
Calculating Input
We've provided a
parse_input
stub for you to fill in to turn the command-line argument to start.rs into a
value suitable for passing to our_code_starts_here. As a reminder/reference,
the first argument in the x86_64 calling convention is stored in rdi. This
means that, for example, moving rdi into rax is a good way to get “the
answer” for the expression input.
Representations
In class we chose representations with 0 as a tag bit for numbers and 1 for
booleans with the values 3 for true and 1 for false. You do not
have to use those, though it's a great starting point and we recommend it. Your
only obligation is to match the behavior described in the specification, and if
you prefer a different way to distinguish types, you can use it. (Keep in mind,
though, that you still must generate assembly programs that have the specified
behavior!)
Running and Testing
The test format changed slightly to require a test name along with a test
file name. This is to support using the same test file with different
command line arguments. You can see several of these in the sample
tests.
Note that providing input is optional. These also illustrate how to check for
errors.
If you want to try out a single file from the command line (and perhaps from a
debugger like gdb or lldb), you can still run them directly from the
command line with:
$ make tests/some-file.run
$ ./tests/some-file.run 1234
where the 1234 could be any valid command-line argument.
As a note on running all the tests, the best option is to use make test,
which ensures that cargo build is run first and independently before cargo test.
Grading
As with the previous assignment, a lot of the credit you get will be based on us running autograded tests on your submission. You'll be able to see the result of some of these on while the assignment is out, but we may have more that we don't show results for until after assignments are all submitted.
We'll combine that with some amount of manual grading involving looking at your
testing and implementation strategy. You should have your own thorough test
suite (it's not unreasonable to write many dozens of tests; you probably don't
need hundreds), and you need to have recognizably implemented a compiler. For
example, you could try to calculate the answer for these programs and
generate a single mov instruction: don't do that, it doesn't demonstrate the
learning outcomes we care about.
Any credit you lose will come with instructions for fixing similar mistakes on future assignments.
FAQ
Some of my tests fail with a No such file or directory error
The initial version of the starter code contained an error in the testing infrastructure. If you cloned before we fixed it, you'll have to update the code. You can update the code by running:
git remote add upstream https://github.com/ucsd-compilers-s23/cobra-starter
git pull upstream main --allow-unrelated-histories
This will merge all commits from the template into your repository. Alternatively, you can also
clone https://github.com/ucsd-compilers-s23/cobra-starter and manually replace your tests/
directory.
Extension: Using Dynamic Information to Optimize
A compiler for Cobra needs to generate extra instructions to check for booleans
being used in binary operators. We could use a static type-checker to avoid
these, but at the same time, the language is fundamentally dynamic because the
compiler cannot know the type of input until the program starts running
(which happens after it is compiled). This is the general problem that systems
for languages like JavaScript and Python face; it will get worse when we
introduce functions in the next assignment.
However, if our compiler can make use of some dynamic information, we can do better.
There are two instructive optimizations we can make with dynamic information, one for standalone programs and one at the REPL.
Eval
Add a new command-line option, -e, for “eval”, that evaluates a program
directly after compiling it with knowledge of the command-line argument. The
usage should be:
cargo run -- -e file.snek <arg>
That is, you provide both the file and the command-line argument. When called
this way, the compiler should skip any instructions used for checking for
errors related to input. For example, for this program, if a number is given
as the argument, we could omit all of the tag checking related to the input
argument (and since 1 is a literal, we could recover essentially the same
compilation as for Boa).
(+ 1 input)
For this program, if input is a boolean, we should preserve that the program
throws an error as usual.
Known Variables at the REPL
Similarly, after a define statement evaluates at the REPL, we can know that
variable's tag and use that information to compile future entries. For example,
in this REPL sequence, we define a numeric variable and use it in an operator
later. We could avoid tag checks for x in the later use:
> (define x (+ 3 4))
> (+ x 10)
Note a pitfall here – if you allow set! on defined variables, their types
could change mid-expression, so there are some restrictions on when this should
be applied. Make sure to test this case.
Happy hacking!
Discussion
It's worth re-emphasizing that a static type-checker could recover a lot of
this performance, and for Cobra it's pretty straightforward to implement a
type-checker (especially for expressions that don't involve input).
However, we'll soon introduce functions, which add a whole new layer of potential dynamism and unknown types (because of function arguments), so the same principles behind these simple cases become much more pronounced. And a language with functions and a static type system is quite different from a language with functions and no static type system.

Week 4: Caduceus, Due Wednesday, May 3, 10pm
In this assignment, you'll spend time reflecting on, and learning from, the designs you and others chose for PA3.
We will make PA3 compilers available to the class. Fill out this form by 8am on Thursday, April 27 if you'd like your compiler to be included. We'll make the review assignments by the end of the day on Thursday, April 27. Feel free to clean up or modify your repository prior to sharing it; we'll download what's at the repo link you give on Thursday:
https://docs.google.com/forms/d/e/1FAIpQLSeF-0Ihc-MGmGOIcO2_zyzJyfosXuyc5-2CJ-VpP57V6ZG-jA/viewform
You will be assigned 2 other compilers to review.
Your feedback will be shared with the class (including the author of the compiler), so make sure to keep what you write professional and constructive.
Assigned Compilers
All submitted compilers and the instructions for downloading them are available via this EdStem post: https://edstem.org/us/courses/38748/discussion/3036419
Tracing the Compiler
For each of the compilers you are reviewing, choose two programs that run successfully on the compiler under review (e.g. they match the correct behavior). Make sure that between them, they at least use:
- A loop that runs several times and terminates
- At least 2 different binary operators
input
For each program you chose, show three relevant code snippets from the compiler that are critical to its compilation. For example, you might show the data structures used in the type checker, the code generation, and the parsing for a particular expression. Only choose the same snippet of code for both programs if it behaves in an interestingly different way across the two.
For each code snippet, write a sentence of how it relates to different parts of the program you're testing.
You can use the same two programs on both compilers if you think they illustrate the behavior well.
This means you should have a total of twelve code snippets (three per compiler, per two examples).
Bugs, Missing Features, and Design Decisions
For each compiler you are reviewing, choose a program that has different behavior than it should.
-
If a key feature in the program isn't implemented, describe how you would add it to the compiler (see below for how to do this).
-
If it is implemented but produces an error, describe how you could fix the error and make it produce the correct answer (see below for how to do this)
-
If it is implemented but produces the wrong answer, decide if you think this was a reasonable design decision. Describe as appropriate:
- If you think producing this answer instead made certain parts of the compiler design simpler or easier than matching the spec, and identify how.
- If you think it's just a bug, and if so, how to fix it.
- If you think it's a better design decision than what was chosen for Cobra.
-
If you think the compiler perfectly implements Cobra, explain what you tested to reach this conclusion and why you are confident that it does.
Lessons and Advice
Answer the following questions:
- Identify a decision made in this compiler that's different from yours. Describe one way in which it's a better design decision than you made.
- Identify a decision made in this compiler that's different from yours. Describe one way in which it's a worse design decision than you made.
- What's one improvement you'll make to your compiler based on seeing this one?
- What's one improvement you recommend this author makes to their compiler based on reviewing it?
Handin
You will this assignment as a PDF, first with the pages containing the review of the first compiler you were assigned followed by pages containing the review of the second. Please start the review of the second compiler on a new page. (We wish you could submit and label 2 pdfs but Gradescope doesn't allow that).

Week 5: Diamondback, Due Thursday, May 11 (Closed Collaboration)
In this assignment you'll implement a compiler for a language called Diamondback, which has top-level function definitions.
This assignment is closed to collaboration.
Setup
Get the assignment at https://classroom.github.com/a/q383lTNN This will make a private-to-you copy of the repository hosted within the course's organization. You can also access the public starter code https://github.com/ucsd-compilers-s23/diamondback-starter if you don't have or prefer not to use a Github account.
The Diamondback Language
Concrete Syntax
The concrete syntax of Diamondback has a significant change from past
languages. It distinguishes top-level declarations from expressions. The new
parts are function definitions, function calls, and the print unary operator.
<prog> := <defn>* <expr>                (new!)
<defn> := (fun (<name> <name>*) <expr>) (new!)
<expr> :=
  | <number>
  | true
  | false
  | input
  | <identifier>
  | (let (<binding>+) <expr>)
  | (<op1> <expr>)
  | (<op2> <expr> <expr>)
  | (set! <name> <expr>)
  | (if <expr> <expr> <expr>)
  | (block <expr>+)
  | (loop <expr>)
  | (break <expr>)
  | (<name> <expr>*)                    (new!)

<op1> := add1 | sub1 | isnum | isbool | print (new!)
<op2> := + | - | * | < | > | >= | <= | =

<binding> := (<identifier> <expr>)
Abstract Syntax
You can choose the abstract syntax you use for Diamondback.
Semantics
A Diamondback program always evaluates to a single integer, a single boolean,
or ends with an error. When ending with an error, it should print a message to
standard error (eprintln! in Rust works well for this) and a non-zero exit
code (std::process::exit(N) for nonzero N in Rust works well for this).
A Diamondback program starts by evaluating the <expr> at the end of the
<prog>. The new expressions have the following semantics:
(<name> <expr>*)is a function call. It first evaluates the expressions to values. Then it evaluates the body of the corresponding function definition (the one with the given<name>) with the values bound to each of the parameter names in that definition.(print <expr>)evaluates the expression to a value and prints it to standard output followed by a\ncharacter. Theprintexpression itself should evaluate to the given value.
There are several examples further down to make this concrete.
The compiler should stop and report an error if:
- There is a call to a function name that doesn't exist
- Multiple functions are defined with the same name
- A function's parameter list has a duplicate name
- There is a call to a function with the wrong number of arguments
inputis used in a function definition (rather than in the expression at the end). It's worth thinking of that final expression as themainfunction or method
If there are multiple errors, the compiler can report any non-empty subset of them.
Here are some examples of Diamondback programs.
Example 1
(fun (fact n)
  (let
    ((i 1) (acc 1))
    (loop
      (if (> i n)
        (break acc)
        (block
          (set! acc (* acc i))
          (set! i (+ i 1))
        )
      )
    )
  )
)
(fact input)
Example 2
(fun (isodd n)
  (if (< n 0)
      (isodd (- 0 n))
      (if (= n 0)
          false
          (iseven (sub1 n))
      )
  )
)

(fun (iseven n)
  (if (= n 0)
      true
      (isodd (sub1 n))
  )
)

(block
  (print input)
  (print (iseven input))
)
Implementing a Compiler for Diamondback
The main new feature in Diamondback is functions. You should choose and implement a calling convention for these. You're welcome to use the “standard” x86_64 sysv as a convention, or use some of what we discussed in class, or choose something else entirely. Remember that when calling runtime functions in Rust, the generated code needs to respect that calling convention.
A compiler for Diamondback does not need guarantee safe-for-space tail calls, but they are allowed.
Running and Testing
Running and testing are as for Cobra, there is no new infrastructure.
Reference interpreter
You may check the behavior of programs using this interpreter.
Grading
As with the previous assignment, a lot of the credit you get will be based on us running autograded tests on your submission. You'll be able to see the result of some of these on while the assignment is out, but we may have more that we don't show results for until after assignments are all submitted.
We'll combine that with some amount of manual grading involving looking at your
testing and implementation strategy. You should have your own thorough test
suite (it's not unreasonable to write many dozens of tests; you probably don't
need hundreds), and you need to have recognizably implemented a compiler. For
example, you could try to calculate the answer for these programs and
generate a single mov instruction: don't do that, it doesn't demonstrate the
learning outcomes we care about.
Extension 1: Proper Tail Calls
Implement safe-for-space tail calls for Diamondback. Test with deeply-nested recursion. To make sure you've tested proper tail calls and not just tail recursion, test deeply-nested mutual recursion between functions with different numbers of arguments.
Extension 2: Add Function Definitions to the REPL
Add the ability to define functions to the REPL. Entries should be a definition
(which could be define or fun) or an expression.
Functions should be able to use global variables defined in earlier entries
in the function body.
Extension 3: Compiling Functions with Dynamically-Discovered Types
Consider a function like this one from class:
(fun (sumrec num sofar)
  (if (= num 0)
      sofar
      (sumrec (+ num -1) (+ sofar num))))
Because this function could be called with booleans for num or sofar, the
compiler is obligated to insert tag checks for the = and + operations here.
(Actually, there are some kinds of purely-static optimizations we could do
here; if control-flow reaches the else branch we know that num is a number
because otherwise the = check would have errored, so could elide the checks
for (+ num -1); there are some similar examples in section 2 of this
paper,
which discusses some more complex cases. However that won't be the focus of
this extension.)
We could save some work by doing all the tag checks before entering the
function body, compiling specific versions of the function for each different
combination of arguments, then dispatching to the correct one based on the
observed tags. This is common practice in JIT compilers, both at the function
leve and at the block
level. This would re-use some of the ideas
from the previous assignment on using the observed types of input and
defined variables to specialize code. In the sumrec example, the compiler
would generate 4 different functions for something like sumrec:
(fun (sumrec num sofar)
  (case
    [(and (isnum num) (isnum sofar)) (sumrec_assume_num_num num sofar)]
    [(and (isnum num) (isbool sofar)) (sumrec_assume_num_bool num sofar)]
    [(and (isbool num) (isnum sofar)) (sumrec_assume_bool_num num sofar)]
    [(and (isbool num) (isbool sofar)) (sumrec_assume_bool_bool num sofar)]))
However, this quickly explodes generated code size as we introduce more types and more arguments (it's (#types) to the power of (#args), and for a general-purpose compiler we should avoid creating binaries that are exponential in the size of the source program!). The references above use dynamic information to avoid this ahead-of-time explosion. We need to be a bit more clever as well.
For this extension, we'll pick a simple model that is surprisingly effective and uses the dynamic code-generation techniques we've been studying:
The first time a function is called, the types of the arguments are likely the types that will be given to that function again in the future, and it's worth specializing for that case.
This would allow us to compile just two versions of a function:
- One that handles all possible combinations of arguments with all tag checks, making no assumptions
- One that is specialized to the types of the arguments seen for the first call to the function
The first version is the one generated by the standard compiler. Generating the second is where the dynamic work happens.
There are a number of ways to set this up. We recommend making use of some of
the dynamic assembly editing features of dynasm. The
alter
method allows for changing already generated code. A short demo of alter is
in the
adder-dyn
repository.
The process of taking a running function, jumping to the compiler, rewriting the code of that function, then going back to it, involves some thought about stack manipulation manipulation. (In general, in real-world JIT compilers, the process of on-stack replacement (OSR) grows quite complex, with shuffling registers and converting between stack frame layouts.) Here's one way we recommend implementing the required behavior.
-
Start from your code for
evalin the previous assignment (e.g. make sure you're in the context of the compiler with all the necessary pieces imported) -
On first compile, for each function, compile the “slow” version and put its code at the label
slow_<function-name>:. -
Also compile a “stub” with the function's actual name that calls back into a (Rust) function with the provided arguments and a reference to the (Snek) function to be compiled:
<function-name>: mov rdi, <fun reference> ; The address of a reference, like a *const Definition mov rsi, arg1 mov rdx, arg2 ... all args ... jmp compile_opt_N ; Just one copy of compile_opt_N in the generated code, not one per function compile_opt_N: call compile_opt_rust_N ; jmp rax ; compile_opt_N will return a function pointer! ; depending on your calling convention, you may ; or may not need to clean up and set up some ; registers before the jmp to make the stack frame ; “look right” -
To get a reference to the Snek function being compiled, you can get a raw pointer to the actual
Fundefinition object, and put the number of that address into the generated code as an immediate value. You can then cast back to a&Definitionbelow. You could also store an index (in theVec<Definition>that likely makes up part of the AST), but you'd still need some way to pass that vector back to the stub, below, so some raw address will probably be needed. Think about lifetimes just as much as you need to make sure the AST will be available and not dropped by the time this compilation happens! -
The
compile_opt_rust_Nfunction will be implemented in Rust and have a signature like:extern "C" fn compile_opt_rust_N( def: *const Definition, arg1: u64, ... argN: u64 ) { // compile the definition and return a function pointer to the version to // call }In this Rust function you can compile the optimized version of the function based on the given arguments' tags. You can probably re-use code you wrote for the previous extension to compile the optimized version with known tags for those arguments.
-
This code will likely use
alterfor two different purposes:- First, add a new label
fast_<function-name>with the generated optimized code at the end of the generated code. - Then, rewrite the body of
<function-name>to have a conditional check for the provided tags, andjmpto thefastorslowversion as appropriate (note that this is trivially a tail call)
- First, add a new label
-
Don't forget to get the address of the generated code that it can be called! Future calls to
<function-name>will use the overwritten code, but for this first call you need to make sure to do the call yourself. -
We recommend creating a few versions of
compile_opt_Nfor argument list lengths 0, 1, 2 until the pattern is clear, and only then try to generalize to a varargs Rust function.
There are definitely other ways to set this up, but we think this scheme can be made to work.
There is a lot of thinking and debugging required here! Don't be surprised if this takes longer than the previous extensions; we don't have a great calibration of the expected pace of these, so there's no expectation that it takes (only) a week -- it may well take the rest of the quarter.

Week 6-7: Egg Eater, Due Tuesday, May 23 (Open Collaboration)
In this assignment you'll implement heap allocated structures in your compiler.
Setup
There is no starter repository for this assignment. You should pick a starting point for the compiler based on your own previous work or provided code from class/from the code review assignment. Functions are necessary, but you can get away with 1- and 2-argument functions, so you can start from code from class.
Your Additions
You should add the following features:
-
Some mechanism for heap-allocation of an arbitrary number of values. That is, the
(pair <expr> <expr>)from class would not be sufficient because it only supports two positions. The easiest thing might be to add tuples with any number of positions in the constructor (e.g.(tuple <expr>+)). You could also consider adding arrays/vectors that initialize with a number of slots/words to create (e.g.(array <expr>)where the<expr>evaluates to a value). There are other creative options, but you're only required to pick and implement one. -
An expression for lookup that allows computed indexed access. That is, you should have an expression like
(index <expr> <expr>)
where the first expression evaluates to a heap-allocated value and the second evaluates to a number, and the value at that index is returned.
This expression must report a dynamic error if an out-of-bounds index is given.
-
If a heap-allocated value is the result of a program or printed by
print, all of its contents should be printed in some format that makes it clear which values are part of the same heap data. For example, in the output all the values associated with a particular location may be enclosed in parentheses. -
Any other features needed to express the programs listed in the section on required tests below.
The following features are explicitly optional and not required:
- Updating elements of heap-allocated values
- Structural equality (
=can mean physical/reference equality) - Detecting when out-of-memory occurs. Your language should be able to allocate at least a few tens of thousands of words, but doesn't need to detect or recover from filling up memory.
Required Tests
input/simple_examples.boa– A program with a number of simple examples of constructing and accessing heap-allocated data in your language.input/error-tag.boa– A program with a runtime tag-checking error related to heap-allocated values.input/error-bounds.boa– A program with a runtime error related to out-of-bounds indexing of heap-allocated values.input/error3.boa– A third program with a different error than the other two related to heap-allocated values.input/points.boa– A program with a function that takes an x and a y coordinate and produces a structure with those values, and a function that takes two points and returns a new point with their x and y coordinates added together, along with several tests that print example output from calling these functions.input/bst.boa– A program that illustrates how your language enables the creation of binary search trees, and implements functions to add an element and check if an element is in the tree. Include several tests that print example output from calling these functions.
Handin and Design Document
There are no autograding tests or associated points, your submission will be graded based on an associated design document you submit, summarized below.
Your PDF should contain:
- The concrete grammar of your language, pointing out and describing the new concrete syntax beyond Diamondback/your starting point. Graded on clarity and completeness (it’s clear what’s new, everything new is there) and if it’s accurately reflected by your parse implementation.
- A diagram of how heap-allocated values are arranged on the heap, including any extra words like the size of an allocated value or other metadata. Graded on clarity and completeness, and if it matches the implementation of heap allocation in the compiler.
- The required tests above. In addition to appearing in the code you submit,
they should be in the PDF). These will be partially graded on your
explanation and provided code, and partially on if your compiler implements
them according to your expectations.
- For each of the
errorfiles, show running the compiled code at the terminal and explain in which phase your compiler and/or runtime catches the error. - For the others, include the actual output of running the program (in terms of stdout/stderr), the output you’d like them to have (if you couldn't get something working) and any notes on interesting features of that output.
- For each of the
- Pick two other programming languages you know that support heap-allocated data, and describe why your language’s design is more like one than the other.
- A list of the resources you used to complete the assignment, including message board posts, online resources (including resources outside the course readings like Stack Overflow or blog posts with design ideas), and students or course staff discussions you had in-person. Please do collaborate and give credit to your collaborators.
Write a professional document that could be shared with a team that works on the language, or users of it, to introduce them to it.
Submit a PDF containing this writeup to the pa6-doc assignment. Submit your
code, including all tests, and also including the same PDF in the root of the
repository as design.pdf, to the pa6-code assignment. This dual submission
is best for us to review and grade the assignments.
Happy hacking!
Extensions
- Add structure update (e.g.
setfst!from class) - Add structural equality (choose a new operator if you like)
- Update your compiler with extensions from previous assignments to support heap allocation (e.g. REPL, JIT, and so on). Leave out any new tag checks related to heap-allocated values as appropriate.
Grading
Grading will generally based on clarity and completeness of your writing, and based on implementing features and tests that match the descriptions above.

Week 8-9: Forest Flame, Due Thursday, June 1st (Closed Collaboration)
In this assignment you'll implement garbage collection for a language called Forest Flame, which uses our design for heap allocation.
Setup
For this assignment, you will (as in previous assignments) submit both a compiler and a runtime.
Since garbage collection is a runtime feature, we provide a working Forest Flame compiler for you: (github classroom, public starter code). If you use the starter code, you'll only have to modify the runtime. However, feel free to instead update your own Egg-Eater compiler to match the Forest Flame spec.
If you are participating in the Rust error study, please make sure you have the
build.rs and config.txt files in the new repository and set a new project
value in config.txt if you are using the starter code.
The Forest Flame Language
The Forest Flame language extends Diamondback with heap allocation and garbage collection.
Concrete Syntax
<prog> := <defn>* <expr>
<defn> := (fun (<name> <name>*) <expr>)
<expr> :=
  | <number>
  | true
  | false
  | nil
  | input
  | <identifier>
  | (let (<binding>+) <expr>)
  | (<op1> <expr>)
  | (<op2> <expr> <expr>)
  | (set! <name> <expr>)
  | (if <expr> <expr> <expr>)
  | (block <expr>+)
  | (loop <expr>)
  | (break <expr>)
  | (gc)
  | (vec <expr>*)
  | (make-vec <expr> <expr>)
  | (vec-get <expr> <expr>)
  | (vec-set! <expr> <expr> <expr>)
  | (vec-len <expr>)
  | (<name> <expr>*)
optionally:
  | (snek-<name> <expr>*)

<op1> := add1 | sub1 | isnum | isbool | isvec | print
<op2> := + | - | * | / | < | > | >= | <= | =

<binding> := (<identifier> <expr>)
The new pieces of syntax are nil, gc, vec, make-vec, vec-get,
vec-set!, vec-len, isvec, and / (division).
Additionally, it allows for any implementation-defined extra operations that
start with snek-,
which compilers for Forest Flame may implement or not as they like.
The starter code implements a (snek-printstack) operation.
Semantics
Forest Flame adds the runtime type of vectors.
A vector is either nil or a heap-allocated list of zero or more elements.
It adds these new syntax constructs:
-
nilevaluates to thenilvector. -
(gc)forces the garbage collector to run, and returns 0. -
(vec arg1 ... argN)allocates a new vector on the heap of sizeNwith contents[arg1, ..., argN]. -
(make-vec count value)allocates a new vector on the heap of sizecountwith contents[value, value, value, ...].It gives a runtime error if
countdoes not evaluate to a number, or if it evaluates to a negative number. -
(vec-get vec index)gets theindexth component ofvec.It gives a runtime error if
vecdoes not evaluate to a non-nil vector or ifindexdoes not evaluate to a valid (0-based) index into the vector. -
(vec-set! vec index value)sets theindexth component ofvectovalueand returnsvec.It gives a runtime error if
vecdoes not evaluate to a non-nil vector or ifindexdoes not evaluate to a valid (0-based) index into the vector. -
(vec-len vec)returns number of items ofvec.It gives a runtime error if
vecdoes not evaluate to a non-nil vector. -
(isvec value)returnstrueifvalueis a vector (possibly nil) andfalseotherwise. -
(/ x y)implements division and gives a runtime error if the denominatoryis zero. -
(snek-<name> args...): the specification and behavior of operations beginning withsnek-is implementation-defined. This means compilers can do whatever they want with these operations.The motivation is to make debugging your GC easier: feel free to add whatever built-in debugging operations would be helpful. For example, the starter code compiler implements a
(snek-printstack)operation. -
=should implement reference equality for vectors. -
Vectors are printed as comma-separated lists surrounded by square brackets,
nilis printed asnil, and cyclic references should be printed as[...].For example, the cyclic linked list containing
trueandnilwould be printed as[true, [nil, [...]]].
In addition, the compiled program now takes two arguments instead of just one.
-
The first argument is the input, which may be
true,false, or a number. If no arguments are provided, the default input isfalse. -
The second argument is the heap size in (8-byte) words, which must be a nonnegative number. If no second argument is provided, the default heap size is 10000.
During a program's execution, if heap space runs out, it runs the garbage
collector. If there is still not enough heap space, it exits with the error out of memory.
Examples
This program implements several linked list manipluations, which involve
allocating a lot of data which eventually becomes garbage.
It prints out "1\n2\n3\n4\n5\n5\n4\n3\n2\n1".
(fun (range n m)
  (if (= n m) (vec n nil) (vec n (range (add1 n) m))))

(fun (append list1 list2)
  (if (= list1 nil)
      list2
      (vec (vec-get list1 0) (append (vec-get list1 1) list2))))

(fun (reverse list)
  (if (= list nil) nil (append (reverse (vec-get list 1)) (vec (vec-get list 0) nil))))

(fun (printall list) (loop
  (if (= list nil) (break nil) (block
    (print (vec-get list 0))
    (set! list (vec-get list 1))
  ))))

(let ((list (range 1 5)))
  (printall (append list (reverse list))))
See also the other examples in the tests/ directory of the starter code.
Garbage collection
You will edit runtime/start.rs to implement a mark-compact garbage collector,
as described in lecture.
Object layout
A Forest Flame heap object has two metadata words, followed by the actual data.
- First, there is a GC word, used to store the mark bit and the forwarding
pointer during garbage collection. Outside of garbage collection, the GC word
is always
0. - Next, there is a word which stores the length of the vector. (Note that a
vector of length
lenactually useslen + 2words, from the metadata.) - Next, there is each element of the vector, in order.
For example, the data (vec false true 17) stored at heap address 0x100 would
be represented by the value 0x101 and this heap data:
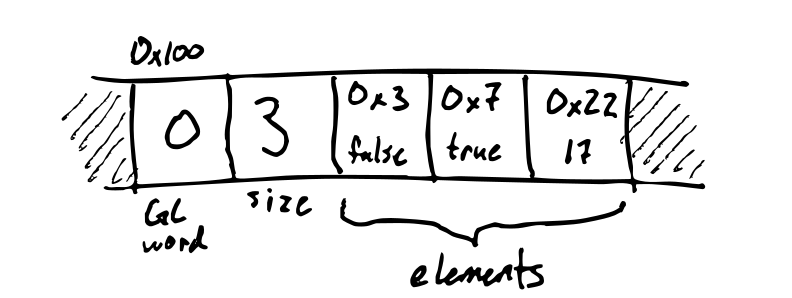
As a running example, consider this program, run with a heap size of 15 words:
(let ((x (vec false true 17))
      (y (vec 1 2)))
     (block
        (set! x (vec nil y nil))
        (set! y nil)
        (gc)))
At the start of collection, the heap looks like this:
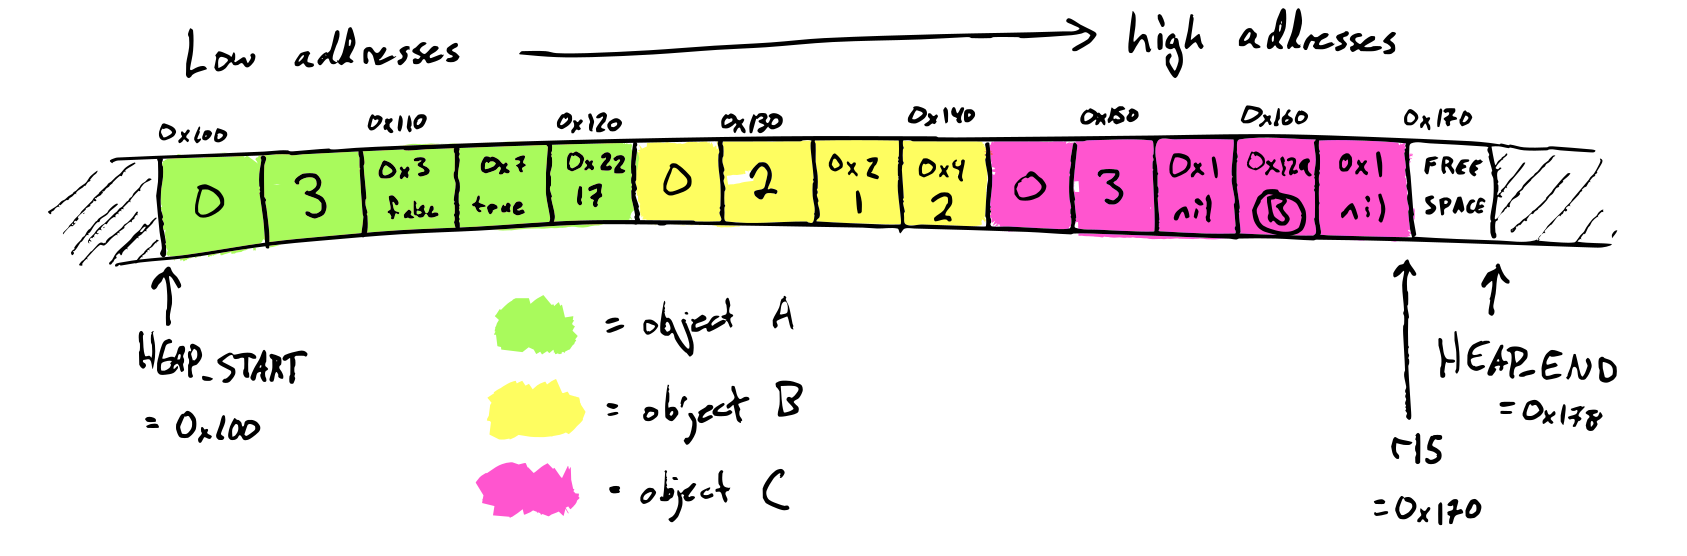
The stack contains the variables x and y. x has value 0x149 = C and
y is nil, so the root set is {C}.
Marking
The first step of mark-compact is marking. We mark a heap object by setting its mark bit, the lowest bit of the GC word. Marking does a graph traversal of the heap, starting from the roots found on the stack.
Here's what the heap looks like after marking:
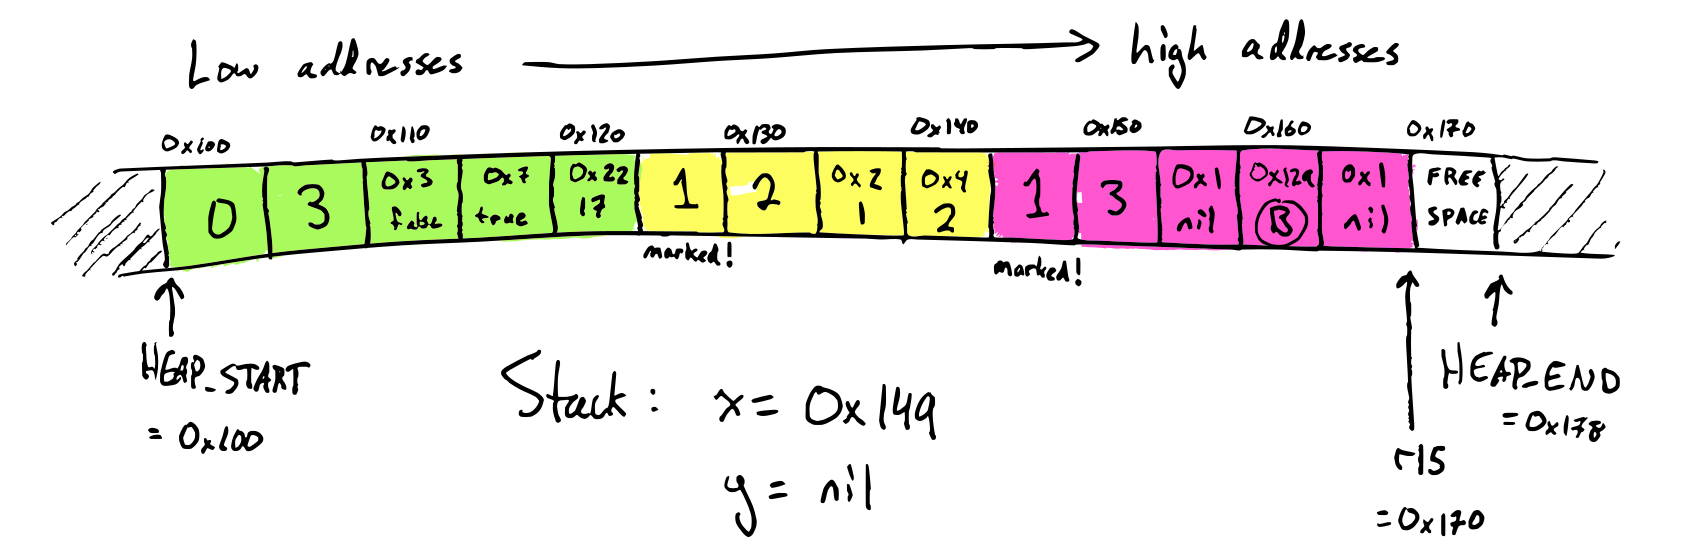
Since object A is not marked, we know that it's dead and we can safely remove it from the heap.
Compacting
The second step of mark-compact is compacting. Compacting has three parts:
- Computing forwarding locations
- Updating references
- Moving objects
Compacting 1: compute forwarding addresses
Once marking is finished, we now know which objects are still alive and which are garbage based on whether the mark bit is set in the GC header. Objects which are still alive get forwarding addresses: this is its new address that it will be moved to after compacting. Computing forwarding addresses is done by a linear scan though the heap. Here's what the heap looks like afterwards:

Compacting 2: update references
In order to move an object, we also have to update all references to that object to point to the new location. We do this by a linear scan though both the heap and the stack, changing each vector to point to the vector's eventual new location. Here's what the heap looks like afterwards:
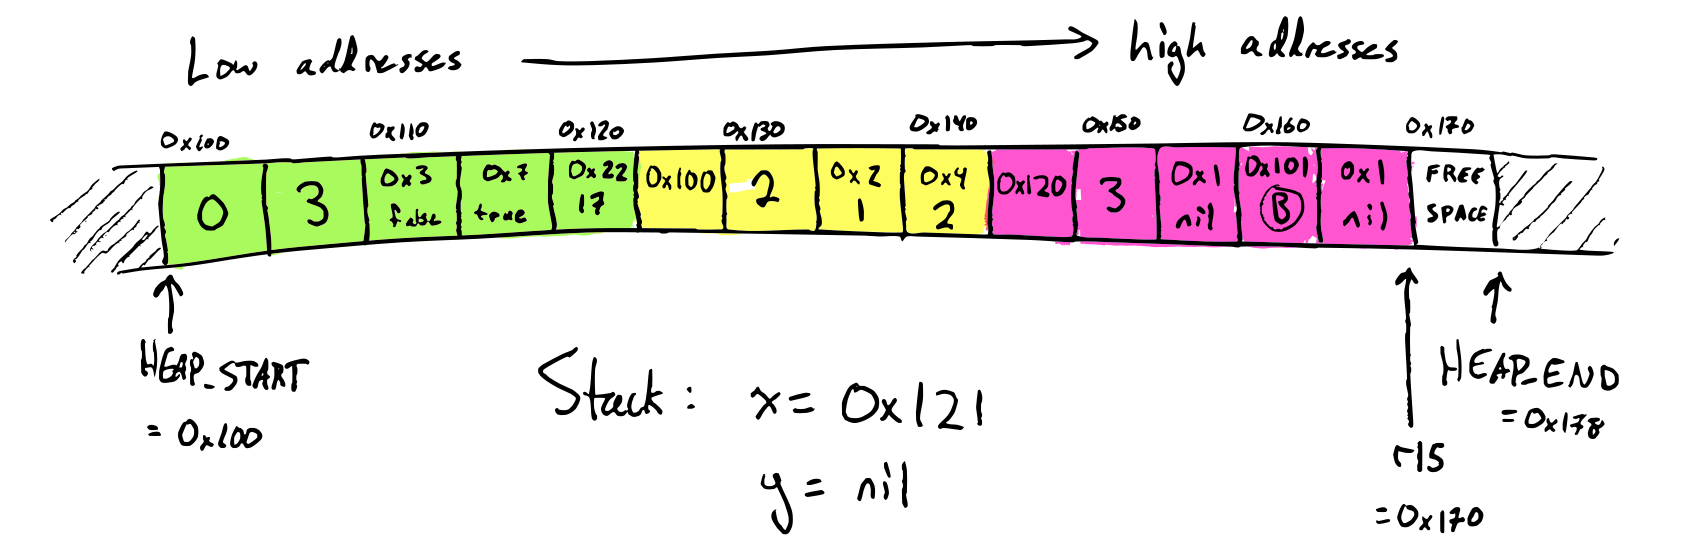
Note that the heap address stored in object C has been changed, and on the
stack, the stack slot storing the variable x has been updated to 0x121.
Compacting 3: move the objects
Lastly, we do the actual compacting, moving heap objects to their destinations. This is also a linear scan through the heap. Here's the final result:
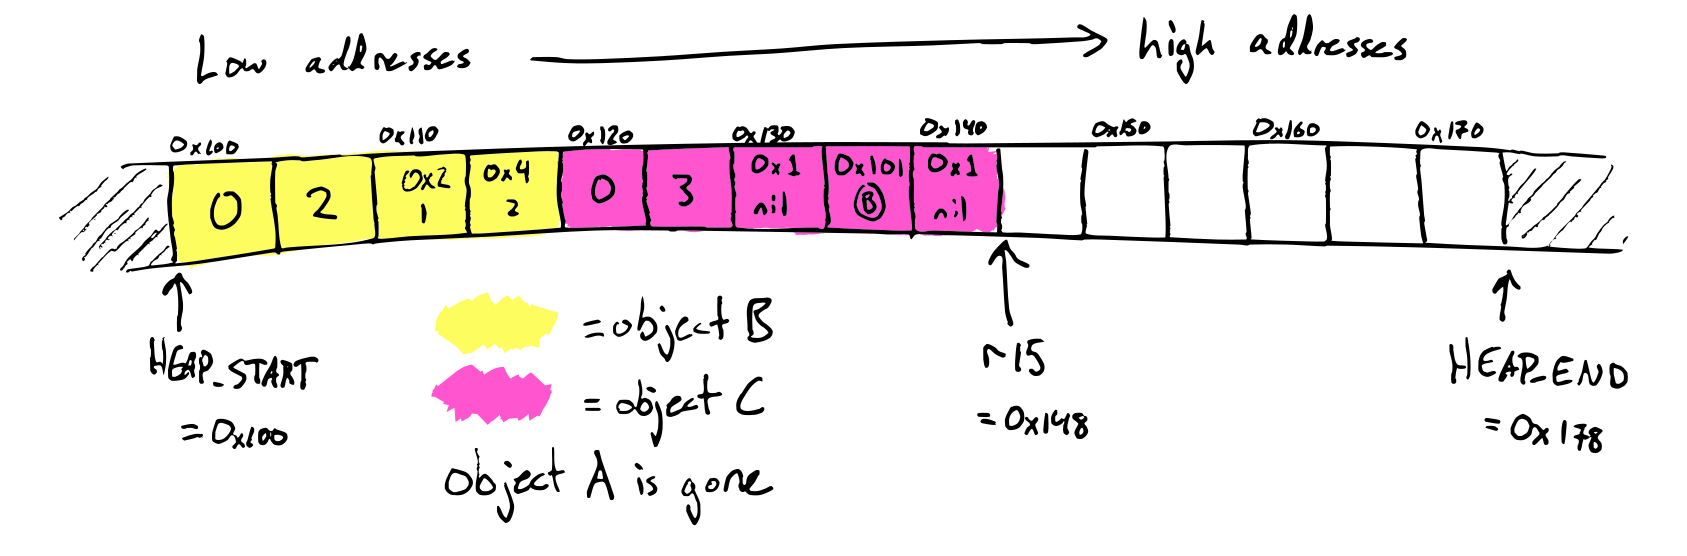
Starter code
The starter code contains the function headers for snek_try_gc and snek_gc
which need to be implemented. snek_gc is called by the (gc) operation, and
snek_try_gc is called when there is not enough room for an allocation.
Heap layout
The static mut Rust variable HEAP_START has the address of the start of
the heap, and HEAP_END has the address of the end of the heap. These are set
once in main when the heap is allocated, and should never change again
throughout the running of the program.
Like the lecture compiler, the starter code uses r15 as a heap pointer. It is
passed to the functions snek_gc and snek_try_gc as the argument heap_ptr.
The space between HEAP_START and heap_ptr is full of objects, and the space
between heap_ptr and HEAP_END is free.
Stack layout
Not everything on the stack is a snek value -- there's also return addresses and some saved registers in there. So, to traverse the stack, it helps to know the exact layout of what it looks like.
The starter code compiler uses a stack frame layout that'll be hopefully
familiar if you've talked about stack frames in other classes, by using rbp as
the frame pointer. This means that during a function's execution, rbp points
to the bottom of the current function's stack frame.
On function entry, the function:
- Pushes the old value of
rbp - Saves
rspinrbp - Subtracts an amount of words from
rspto make room for local variables
Then, on function exit, it:
- Moves
rspback to where it used to be - Restores the old value of
rbpby popping it
(These operations are so common that x86 even has special instructions for them!) Concretely, the stack ends up looking like this:
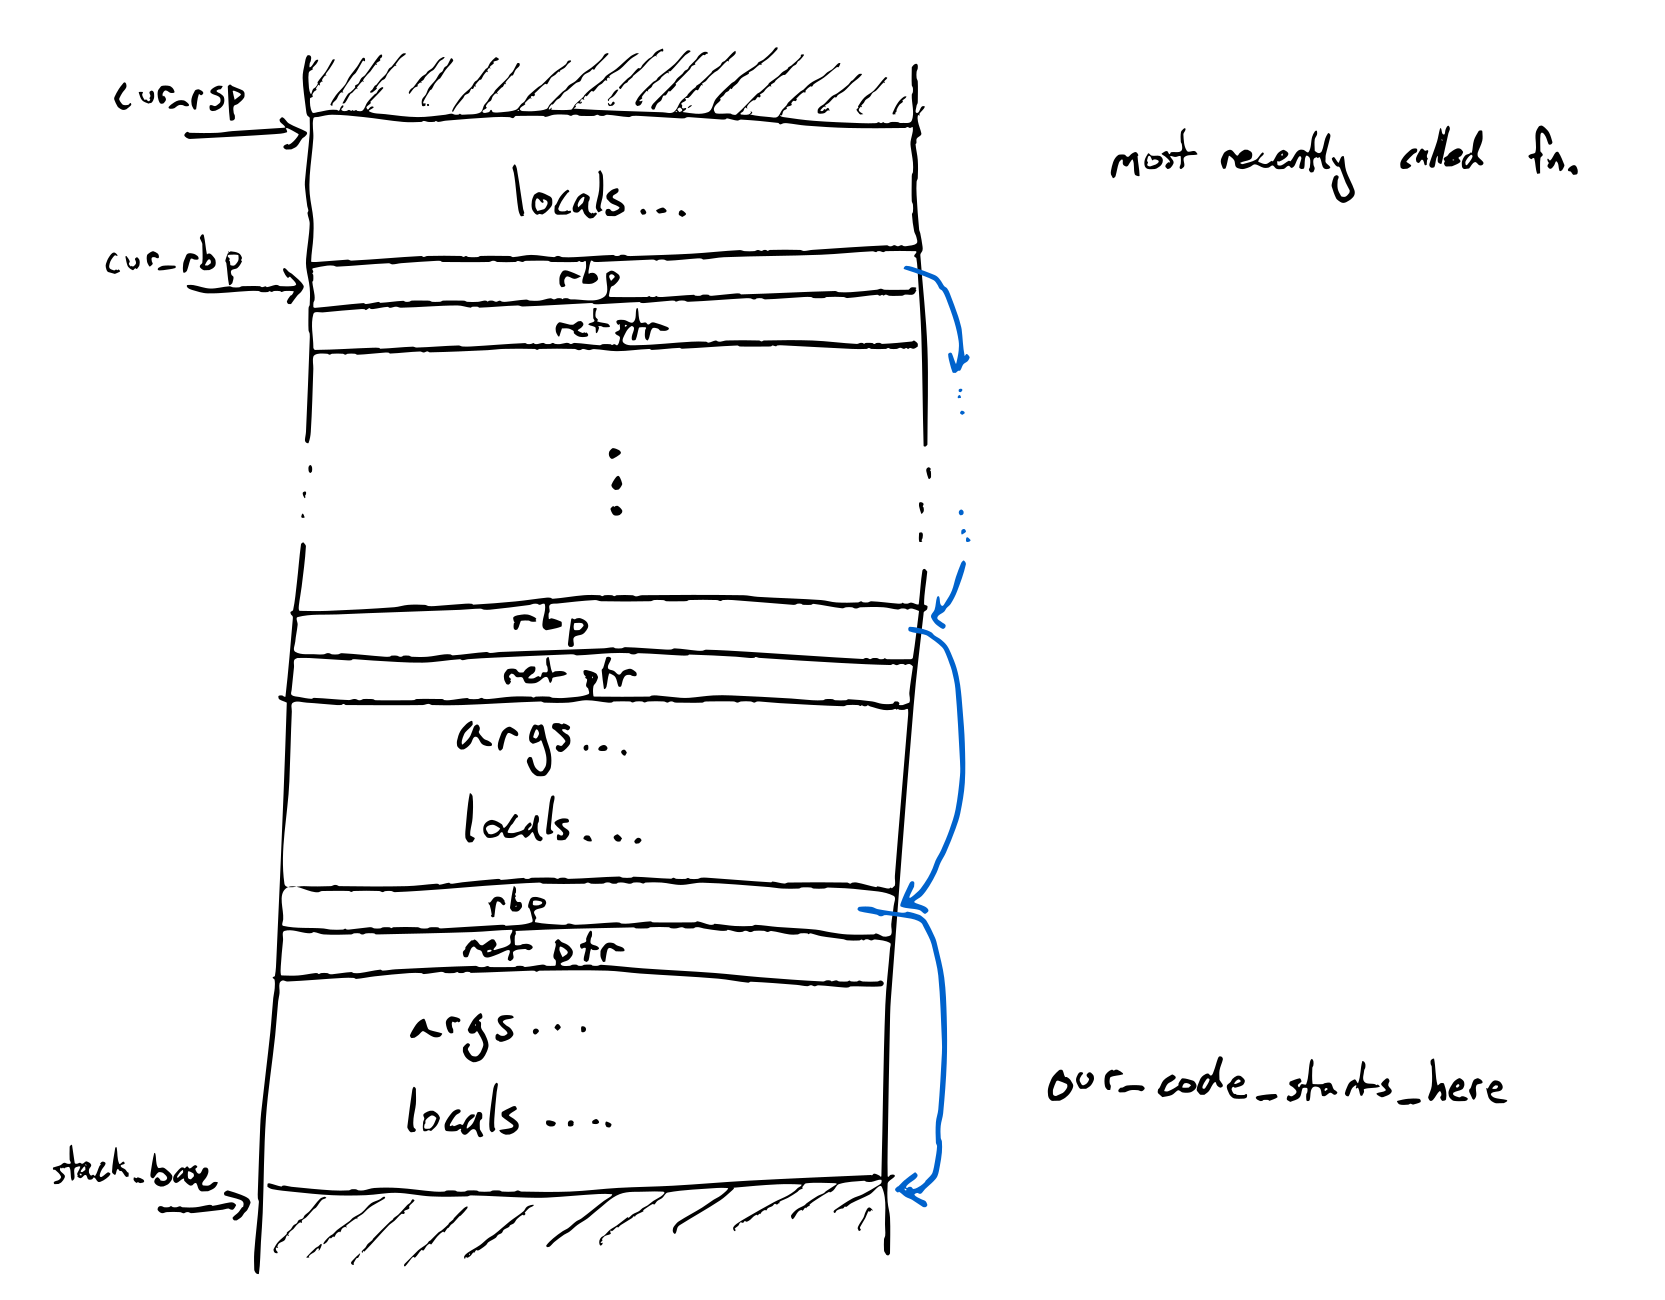
Submission, testing, and grading
Submit via Gradescope.
We will test that your compiler + runtime (a) works, (b) runs out of memory when it should, and (c) doesn't run out of memory when it shouldn't.
-
Your runtime should only allocate as many words of heap space as specified by the command-line argument.
-
Your runtime needs to be able to use the whole heap (so you're more or less forced to use mark/compact)
-
Data on the heap is live if it is reachable from some variable or some currently-in-use temporary storage. (This is exactly the data kept after a GC.)
-
If, during an allocation,
(total live data size) + (new object size)≤(total heap size), then the allocation should succeed. Otherwise, it should halt with the messageout of memory. By “during an allocation”, we mean:- In a
make-vecexpression after the value and size subexpressions have been evaluated - In a
vecexpression after the element expressions have been evaluated
(This is relevant because it specifies that an expression like
(vec (+ nil 9))could never trigger out-of-memory, it would only error because of the runtime tag check on+. We aren't actively trying to test for these kinds of specific cases, but it helps to disambiguate.) - In a
This assignment is officially closed to collaboration, but we have some specific categories where we encourage you to share:
- You may share test cases with your peers by submitting them to the [student test repo] below. Have test cases case you think will break your classmates' GCs? Test cases that helped you fix a bug? Cool programs you just want to share? Make a PR! We'll merge in the pull requests every day or two.
- You may share (publicly on EdStem or otherwise) diagrams or other representations of the heap + stack at various stages in garbage collection to understand examples
Student Test Repo: https://github.com/ucsd-compilers-s23/forest-flame-student-tests
Extension: simple generational GC
As discussed in lecture, nearly all modern garbage collectors take advantage of the high infant mortality rate for heap allocations, by segregating the heap into multiple generations, each of which stores data of a particular age, and processing the older generations less frequently than the younger generations.
In this extension, you'll implement this idea by adding a nursery to your GC.
- The nursery should be around 10% of the size of the old space (the main mark-compact heap).
- Allocations go into the nursery (i.e.,
r15points into here); when nursery space runs out, this triggers a minor collection. (Large objects which don't fit into the nursery should be allocated directly to the old space.) - A minor collection evacuates the nursery, reallocating all its live objects into the old space (using the copying GC algorithm). When main heap space runs out, this triggers a major collection.
- A major collection collects both the nursery and the old space, compacting both the old space and the nursery into the old space.
Write barriers and the remembered set. What root set do we use for a minor collection? Pointers into the nursery can come from two sources: the stack, or the old space. The stack is typically quite small, but we want to avoid traversing the whole old space -- after all, this is what makes a minor collection fast.
So in order to find roots from the old space, we'll make the program keep a log of which old-space objects contain pointers into the nursery. This has a runtime component and a compiler component:
- At run time, we need a physical datastructure (usually called the remembered set) to record which old-space objects may contain pointers into the nursery. A good option here is an array of pointers to old-space objects, together with a header flag in each old-space object saying whether it's already in the remembered set. When the array fills up, you could either resize it, or reset it by triggering a minor collection.
- Before writing to the heap in
vec-set!, we need to check if it's putting a pointer into the nursery into the old space, and if so, update the remembered set accordingly. This requires compiler support. (In general, any kind of GC-related check that happens during memory writes is called a write barrier.)

Week 10: Green Snake, Due Sunday, June 11th (Open Collaboration)
In this assignment you'll either:
- Optimize a Forest Flame compiler to improve its runtime and/or code size
- Fix and extend a previous assignment to demonstrate mastery
Optimization
If you choose to optimize Forest Flame, you're free to use our starter code, your solution that includes garbage collection, your own compiler, and so on as a starting point.
Task
You'll write a compiler that implements Forest Flame, and we'll run and compare your compiler to our reference compiler on a suite of tests. For each test, we'll check:
- That the output is exactly the same as for the starter Forest Flame code
- Whether your optimized version generates an assembly file with fewer instructions than the starter code
- Whether your optimized version generates the answer in less wall-clock time
than the starter code (as measured by
time)
We'll make code for timing and testing available in the week of June 5.
In your submission, include a README.md or a README.pdf that describes the optimizations you chose. It's helpful to us if you highlight some programs where your optimizations do especially well.
This assignment is emphatically open to collaboration, feel free to discuss, share ideas and code, etc. On this assignment, if you want to work directly on the same codebase as another student, feel free to do that as well.
Grading
Focus on doing cool stuff, and getting some amount of optimization to work. We'll check that your submission can make some programs better in a meaningful way, and you don't break anything in the existing tests.
Submit your code to the green-optimization assignment on Gradescope.
Fix and Extend a Previous Assignment
As another option for this assignment, you can implement one of two extensions to either Diamondback or Egg-Eater. If you choose to do that, we'll apply the grade for this assignment as both the 8th assignment grade and a replacement of your grade for that previous assignment as well.
You can only choose and implement one of these, not both.
Extending Egg-Eater
Write or extend your compiler that implements everything required from Egg-Eater, but also:
- Implement structural update (like
setfst!from class) - Implement both structural equality and reference equality (you'll need new concrete syntax for one of them) for the heap-allocated data you designed.
- Make sure that structural equality and printing heap values doesn't result in an infinite loop, but prints/returns something meaningful when a cycle is reached
- Write a new test
input/equal.snekthat demonstrates how structural and reference equality work on non-cyclic values. Make sure to include enough examples, including cases that returntrueandfalse, to demonstrate the behavior thoroughly. - Write 3 new tests
input/cycle-print[1-3].snekthat demonstrate how cyclic printing works for three different examples of cyclic values - Write 3 new tests
input/cycle-equal[1-3].snekthat demonstrate how cyclic equality works for three different examples of cyclic values
Also add to your Egg-Eater writeup (with any updates you want to make), the following at the end:
- A description of your approach to handling structural equality, including relevant snippets of Rust or generated assembly
- A description of your approach to handling cycles, including relevant snippets of Rust or generated assembly
- Show each of your required tests' code and output when compiled and run
- Describe any features other than structural equality and update that you improved since your egg-eater submission
- A list of resources you used to complete the assignment (other code sources, message board posts, LLMs, stack overflow, etc)
Submit your code to green-egg-eater-code and the writeup to
green-egg-eater-written.
Extending Diamondback
Write or extend your compiler that implements everything from Diamondback, but also:
- Make the calling convention support proper safe-for-space tail calls.
- Make sure your implementation passes all of the Diamondback tests.
- Write three new tests
input/tail[1-3].snekthat demonstrate tail calls; they should include function and calls that produce stack overflows without tail calls, but succeed with them enabled. Include:- A test with self recursion only
- A test with two mutually-recursive functions that tail call one another
- Another test of your choice that demonstrates tail call behavior
Also create a PDF writeup with the following components:
- A description of your approach to handling tail calls, including relevant snippets of Rust or generated assembly
- For one of the tests, a memory diagram showing what the stack looks like right before a tail call happens, what the stack looks like during that call, and what the stack looks like when returning from that call
- Show each of your required tests' code and output when compiled and run
- Describe any features other than proper tail calls that you improved since your egg-eater submission
- A list of resources you used to complete the assignment (other code sources, message board posts, LLMs, stack overflow, etc)
Submit the code to green-diamondback-code and the PDF to
green-diamondback-pdf